Sunday, April 29, 2007

Designers beware: 5S Phase 4, Seiketsu (Standardize)

Welcome back to my series on 5S, the methodology to improve organization, order and cleanliness. In this article I cover the fourth phase, Standardize.

But first, if you’re seeing this article and haven’t read the previous four:
Introduction to the methodology
Phase one, Select
Phase two, Organize
Phase three, Clean


Phase four, Standardize

The purpose of this phase is to establish a clear standard for order and cleanliness, in order to maintain the results we achieved with the first three phases. It’s based on easily identifying an abnormal situation from a normal one. When you standardize you avoid:

- Going back to the previous conditions.
- Having work tools laying around.
- Having a disorganized work place that you have to organize again.
- Having people who after implementing Seiri and Seiso still accumulate office supplies on their desk.

And you ensure that:

- Items that don’t belong in the area are easily identified.
- The area is always organized.
- The time to find things is reduced.


Now for the steps:

Step 1: Define
There are several kinds of standards like:
- Oder standards.
- Cleanliness standards.
- Item location visual standards.
- Item quantity visual standards.
- Work place visual standards.

The word “standard” means how that particular item or area is when it’s in an ideal state. In other words, the standard illustrates the ideal state. This step is about defining how it’s supposed to be after you’ve organized and cleaned the space.


Step 2: Document
Remember I told you about documenting everything with your digital camera? Well, that’s because this would be the easiest way to show how your work space should look in an ideal state. You could also draw diagrams of where items need to be placed.

Here’s a picture of how my desk ended up once I implemented the first three phases. It was a lot better (Though not quite as good as it could be, but we’ll get to that in phase 5), so this became the first standard I implemented.


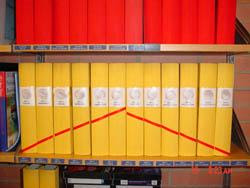
In this next example, see how it’s very easy to recognize when a folder is missing or in the wrong order?


Step 3: Train/divulge
Once you’ve set and documented the standard, you need to make sure that whoever needs to know about it, knows about it! If it’s related to your desk, then maybe you’re the only one you need to know about it. If the standard is of the supplies room, then make sure each person that uses it, knows it, understands it, and follows it. If it’s a picture, post it in a visible spot. If it’s an item quantity standard, post it near the items it relates to.

Now you can compare your current state with the standard and see if they match.

And that’s it for this phase!

But we’re not quite over yet! Meet me here next time to discuss Phase 5, Shitsuke (Improve).
All the best!

Saturday, April 21, 2007

Designers beware: 5S Phase 3, Seiso (Clean)

Welcome back to my series on 5S, the methodology to improve organization, order and cleanliness. In this article I cover the third phase, Clean.

But first, if you’re seeing this article and haven’t read the previous three:
Introduction to the methodology
Phase one, Select
Phase two, Organize

Last week I covered Seiton, where we organized and decided the place for everything. The next phase, Seiso, is about cleaning. Though the methodology lists Seiso as the third phase, it’s possible to clean before you decide where things go.


Phase three, Clean

The purpose of this phase is to eliminate the sources of dirt and to find potentially dangerous areas (i.e. too many plugs in an outlet). When you clean:

- The workplace is a great place to work.
- Things are ready to be used, when needed.
- Cleaning becomes a daily habit.
- Potential safety risks can be addressed.


Now for the exercise:

Step 1: Get ready
Get your supplies like rags and cleaning products and have them ready beforehand.

Step 2: Clean
Pretty straightforward, right? Make sure to be thorough and don’t forget those out of reach places that nobody wants to clean.

Step 3: Place
Place every item in the work area in their decided location.

Step 4: Audit
Once everybody has cleaned their work area, allow for some time, maybe half an hour, in which each person questions how clean every work place is and uses the red labels again, if it’s the case, meaning, if something shouldn’t be in that spot or could be relocated.

And that’s it for this phase!

In industrial environments it has a bigger impact because operators learn more about their machines and see potential industrial risks, like leaks and parts that aren’t working properly, but that’s material for other posts.

By now you’re already seeing the benefits of applying the 5S and if you’ve really embraced it, you’ll notice that you’ve started questioning how other people keep their desks or their houses, haven’t you?

As I said in the first 5S post, you’ll never be the same!

So meet me here next time to cover Phase 4, Seiketsu (Standardize).
All the best!

Sunday, April 15, 2007

Designers beware: 5S Phase 2, Seiton (Organize)

Welcome back to my series on 5S, the methodology to improve organization, order and cleanliness. In this article I cover the second phase, Organize.

But first, if you want to go back to the two previous articles:
Introduction to the methodology
Phase one, Select

Let’s pick up where we left off. Last week I talked about Seiri, to select. At the end of the exercise we had two piles of stuff:

Pile C: The stuff that needs to be in the work space.
Pile D: The stuff that is needed, but not in the immediate work area.


Phase two, Organize

The purpose of this phase is to assign the correct place for each item.

- This will eliminate unnecessary movement because the needed elements are nearby.
- You’ll find elements quicker.
- Error is reduced.
- There are visible clues of where the elements are placed and their quantity.
- The basis for standardization is laid out.


Now for the exercise:

Step 1: Classify
Think about how often you use each item according to the following criteria:

- Infrequent: Things that are used monthly. These can be placed further from the working area.
- Frequent: Things that are used weekly. These can be placed inside the nearby area.
- Very frequent: Things that are used daily. These should be placed in the working area.


Step 2: Quantify
Determine how much of each item is needed in the place where they will be stored. For instance, you may need one black marker on your desk, not five, so the other four can go to the supplies room. Now how many should there be in the supplies room?


Step 3: Place
Determine the exact place where each item goes according to the task they’re used for. Elements needed for the task performed in the specific work area should be inside it.

Group elements according to:
- Process, if they’re used during a specific task, keep them together.
- Function, things that are used for the same purpose, should be kept together.
- Order, things that are used in a certain order, should be placed in a way that will reflect it.


Step 4: Evaluate
Ask yourself:
- Is it obvious when something is missing from its spot?
- Is it obvious when something is there, that shouldn’t be there?
- Do the objects that can be moved, return to their spot?
- Is it visible when you’re running out of supplies?

This step could even include visual clues like contour lines around the spot where things are stored, tags, or quantity indicators to show the maximum amount and the minimum amount so that a new order can be placed.


* This image from the eBook “Estrategia de las 5S” produced by Advanced Productive Solutions, S.L. www.ceroaverias.com


Step 5: Audit
Once everybody has decided the place where everything goes, allow for some extra time, perhaps half an hour, so that everybody can question each other using red labels again. All items marked with red labels need to be relocated within the next few days.


Some additional thoughts:

It is likely that by now you’ve realized that you don’t actually need some of the things you thought you needed. In that case, you can do any of the following actions:

- Store it somewhere else.
- Move it inside the area.
- Sell it.
- Rent it.
- Return it.
- Trash it.

If it’s not needed for the task, it shouldn’t be there. Ideally the only things that should be on a desk is the computer, the immediate supplies like a pen and paper, and the stuff that you’re currently working on. Extra supplies can go in drawers.
Also, don’t forget to document the process with your digital camera.

I want to point out that in the cases of personal offices and desks, 5S is a process that every person needs to assimilate in their own way. Some people are attached to objects that for others have no significant value and this needs to be respected. Each person should take 5S as far as they feel is comfortable for them. For instance, I don’t need to have pictures of every member of my family on my desk; some people do. So beware that everybody has their own pace and nobody is allowed to decide for somebody else in this methodology.

So that’s all for today. Join me here next time to cover Phase 3, Seiso (Clean).

In the meantime let me leave you with this thought: Do you think this can be applied to, say, email, your computer desktop, the closet, the pantry?

All the best!

Sunday, April 08, 2007

Designers beware: 5S Phase 1, Seiri (Select)

Welcome back to my series on 5S, the methodology to improve organization, order and cleanliness.

As I said in my previous post, this methodology can be applied to many aspects of life, as you will surely see in the upcoming weeks, as I unfold the steps to use it in a design studio environment. I won’t go into a lot of depth, since the implementation does depend on your own objectives and the different places of the organization you want to tackle.

So here’s one way of implementing the methodology, CaroAyerbe style:


Let’s say you have a design studio or you work in an in-house design department. Let’s say you want to apply 5S there. The coverage would probably be the design offices and the common areas like the meeting room, the library and/or the supplies room.


Just to show you that I practice what I preach, this here was my actual desk a few years ago, yup, that's my elbow right there...


Before starting:

- Explain the methodology to your people about get a consensus on whether or not they think it’s a good idea to implement it. They always think it's good. (Come on, who doesn’t want to be more productive, right?).
- Designate a team of facilitators which will be in charge of guiding the process.
- One facilitator per area is a good idea.
- Train the facilitators.


Phase one, Select

Basically in this phase you decide what goes and what stays, that’s the main purpose. Why select? Because…

- Work places are filled with clutter.
- The usable space is used by stuff that offers no advantages.
- Closets and shelves contain things that are never used.
- It’s difficult to find the necessary utensils.
- There’s too much stock of stuff you don’t actually need.


What you will need:

- A digital camera. Humans are visual creatures, so one of the best ways to record and evaluate results is to take pictures. The before and after. Ideally, each facilitator has a camera.
- A huge plastic bag, for trash.
- Little red cards. Prepare these beforehand, it can be a little business-card-size piece of paper, with a little ribbon to attach them to objects.


Step 1: Prepare yourself.
Get a plastic bag and red cards.

Step 2: Gather.
Bring all your stuff to one place, near the area you’re working on. Take everything and put it on a big surface… on top of the desk or on the floor. Now, everything means everything. Absolutely every item needs to be accounted for.
It’s necessary to check behind closets, on top of closets, on the walls, places that are not well lit, behind the desk, inside drawers, everywhere.

Step 3: Separate.
Ok, this is where the fun starts! Once everything is in sight, divide it in two piles:

Pile A: The stuff that goes, trash, if you will. What you don’t need.
Pile B: The stuff that stays. What is actually needed or you can’t live without.

So the first pile, pile A, if it’s trash, why make it a pile? Because it’s good to take a picture, and measure how much of what you originally had, was actually garbage. So don’t discard it until the end, but do discard it; this is what the plastic bag is for. The first time we did this, we gathered 127Kg of trash.

By now you’re left with the stuff that is needed, right? Ok, now you’re going to divide that into two new piles:

Pile C: The stuff that needs to be in the work space.
Pile D: The stuff that is needed, but not in the immediate work area.

Step 4: Audit.
Once everybody has separated their materials, allow for some time (maybe half an hour) so that each person can go through other people’s stuff and question if an item should stay by attaching a red card to them. I like to leave a space in the card so that people can write a message on them, something like “do you really need three mugs for your pens?”.

Once the time is over, the person needs to decide whether or not the item goes. Nobody is allowed to remove the cards, until the fate of the item is determined.


And this is the end of phase 1; you now have selected what’s useful.


If you’re one of the facilitators, you will see that deciding what goes and what stays can be tricky for people, especially because we tend to become attached to some objects, so be prepared to deal with someone who thinks they need 7 blue markers and 8 red ones.

If you’re doing this on your own, be honest with yourself and think about what would happen if the object wasn’t there.


Meet me here next time, to talk about Seiton (Organize) and we’ll see what happens to the selected objects!

Do leave me a comment if you have any questions, I’d love to help! Also if you’re familiar with the methodology and would like to add to this article, do so as well! All your comments are welcome.

All the best!


For more information, visit my previous article which is an introduction to the methodology.

Sunday, April 01, 2007

Designers beware: 5 steps to productivity, the 5S.

How would you like to be more productive and have a better workplace? Would you believe me if I said that you can achieve that easily with little or no investment at all?

Would you be able to work here? Do you actually work in a place like this?


Would you like to live like this? Do you currently?


A few years ago, when I was part of the continuous improvement team of the company I worked for, I was entrusted with the task of implementing a certain methodology that promised to improve our productivity. So of course, I had to be the first to test it.

It changed me. I’ll never go back to the way I was before, immersed in clutter, with a feeling of not having any control over my stuff, my activities, my life! Being tired before even starting to work, just by glancing at my desk.

5S (Five eses, if you will) is a methodology that was developed by Japanese companies, mainly Toyota, to improve organization, order and cleanliness in work stations. It can be as extensive as you wish it to be, with thorough measurements of improvement in machinery performance in factory conditions, but as I’ll present in the upcoming posts, it can be applied to almost every aspect of life, yes, the design business included.


What can 5S do for you? Keep reading…

The name 5S responds to five Japanese words that describe each of the five steps:

1. Seiri (Select)
Identify and separate the necessary from the unnecessary items.

2. Seiton (Organize)
Everything has its place.

3. Seiso (Clean)
Identify and eliminate sources of dirt and clutter.

4. Seiketsu (Standardize)
Maintain the status of order and cleanliness achieved.

5. Shitsuke (Improve)
Make it a habit and reach new standards of order and cleanliness.


5S can be defined as an ideal state in which:

- Unnecessary materials or utensils have been eliminated.
- Everything has been identified and been assigned a place.
- Clutter has been eliminated.
- There are visual references to control the status of processes.
- All this is maintained and continuously improved.


By implementing 5S you will:

- Reduce errors.
- Reduce supplies inventory.
- Reduce unnecessary movement.
- Gain more space.
- Be proud of your work place.
- Easily recognize the status of things.
- Quickly find the utensils you need.
- Improve the image your customers have of you.
- Improve your team work and cooperation.
- Improve responsibility and commitment.


There are many resources on the web about this subject, covering all kinds of businesses and situations, big and small, where this methodology can be applied. I’ll be covering each of the steps in a design studio environment and how to implement them and measure the results.

Meet me here next time to cover step 1, Seiri, and learn how to get rid of most of your clutter and not feel guilty about it! :-)

All the best!