Showing posts with label planning. Show all posts

Monday, May 19, 2008

Accountability (Part 1)

From Wikipedia: “Accountability is a concept in ethics with several meanings. It is often used synonymously with such concepts as answerability, enforcement, responsibility, blameworthiness, liability and other terms associated with the expectation of account-giving. As an aspect of governance, it has been central to discussions related to problems in both the public and private (corporation) worlds. […]

In leadership roles, accountability is the acknowledgment and assumption of responsibility for actions,
products, decisions, and policies including the administration, governance and implementation within the scope of the role or employment position and encompassing the obligation to report, explain and be answerable for resulting consequences.”

A few years ago I worked for a Swedish company; one of its core values was “freedom with accountability” which meant that employees were free to act as they saw fit, considering the core values, mission and vision of the company.

So as long as the objectives were met, we were able to come and go from the office, to make our own decisions, to use the company’s resources and to assess situations based on our own principles.

The way most of us responded to this policy was to actually be more responsible, more committed. It taught us that we didn’t need a cop breathing down our necks for us to do better work, to strive for better results, to handle things in on time.

In other words, the company allowed us freedom to choose our courses of action, and in return it got better results from us.

I realize that not everybody will react to such policies in this manner, but rather try to take advantage of the situation to procrastinate and be lazy. Of course in the end, the consequences will be paid.

I am a full supporter of such policies. I believe that being clear about expectations with employees will make it easier to implement these proceedings and, if all goes well, most people will respond the way we did in the Swedish company.

I’m going to touch on three subjects related to accountability: office hours, office site perks and IM in the workplace.


Office hours

There’s usually some office hours policy, right? You’re supposed to go in at certain time in the morning and you’re supposed to leave at some other time in the evening. And you’re supposed to take a fixed amount of time at lunch. This generally applies to everybody except people in sales, or high level managers.

Whenever I’ve been forced to follow the office hours policy, I’ve found myself getting there on time and leaving on time. Not one minute extra. Why? Because it infuriates me that performance and results are measured on a how-long-are-you-at-your-seat basis.

However, whenever I’ve been free to handle my working hours I’ve found myself being more committed to the tasks, mainly because I feel more empowered to manage my time as I see fit, given of course, that I am clear about expectations.

But what exactly are we talking about here?

• Yes, there are office hours, but if you have a personal issue, you can go solve it before coming to the office (Provided this doesn’t cause any trauma on the operation) or leave early to do so.

• Projects and results are evaluated based on completion and quality, instead of how many hours you put into them.

• Weekends are sacred and only you can choose whether or not you go in the office on a weekend to finish something.

• The same goes for after work hours.

• It is expected for the employee to try to balance his working hours with his personal time, as it is vital that employees are rested and energetic to achieve top results in projects.

• It is understood that some personal issues are more important than work.

• People are entitled to take as many breaks as they feel necessary during the day.


Whenever I’ve used these concepts in my experience, employees have never disappointed me.
I leave it out to the community to share some comments about this and about their experiences.

Come back next time, to read Part 2, about office site perks.

Tuesday, October 30, 2007

Time Tracking Tool

Like most designers, I hated Excel. Then one day the best boss I ever had (an engineer, by the way) introduced me to the wonderful world of spreadsheets.

Excel is a very powerful tool once you get to know it. I don’t know that much, actually, but I have developed a few tools to keep track of design traffic and time. Last year I wrote about time measurement and mentioned briefly how to go about tracking time and tasks.

Today I want to go deeper and share with you a tool I created to track the time and activities you do on a daily basis.

It’s pretty simple. With it you can:

· Establish categories for your activities.
· Know how much time you’re spending in such activities, and filter by category.
· Find out if you’re wasting time in meaningless tasks.
· Find out if there are tasks you can delegate, empowering your employees.
· Measure how much time you’re spending at the office.

Also, as I said in the article I mentioned earlier:

You may find that it's more effective to hire a consultant to take care of certain time consuming activities or you may even ask for your suppliers to absorb such activities which would make your operation even more effective.

You need to be aware of how long do your typical projects take, in order to have accurate planning, and how much to charge.

You can plan more strategically ahead of time so that you know if you need to get some outside help for that big project that will be coming next week or if you have some free time to spend on leadership activities with your staff. In other words, when you know how long will your projects take and how they're organized in any given time frame, you get a broader vision of your business.


So without further ado, here’s the tool and the instructions:

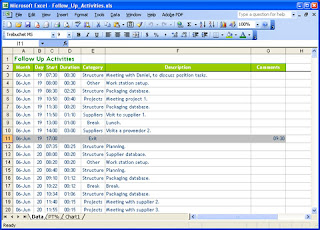
I call it my "Follow Up Activities" spreadsheet. You can download the Excel file here. This is the file as I use it, and this file has been filled for activities for five days, as an example, but feel free to adapt it to your needs!
It’s basically a table with the following fields: Month, Day, Start, Duration, Category, Description and Comments.


Month: This is a text field. I like to name it "00-mmm" where “00” is the number of the month (for instance June would be 06) and “mmm” is the first three letters of the month’s name. Why? Because it allows me to sort by number of the month, instead of the name, so that January will always be at the top, for example.

Day: This is a number field. Type number of the current day.

Start: This is a date/hour field. Type the hour of the day in which that particular activity started, in 24 hour format.

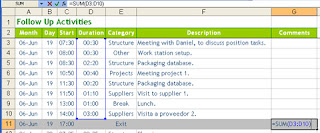
Duration: It’s a date/hour field, with a formula where the duration of the activity is calculated by the starting time of the following task minus the starting time of the previous task. In the picture above the formula would be =C4-C3 for the first cell and then that is copied down on the cells of the D column.

Category: This is a text field. You define the categories of activities. In this example I’ve created seven categories. There’s one called “Breaks” where I record the times I spend on breaks and lunches.

Description: This is a text field. Type a description of the task. I use the same name for the same activity for example I always write “Packaging database” for that particular activity instead of using several different names for it.

Comments: This is a text field. If you wish to add something else like who you met with or if the project was billed, etc.


Now for some instructions:

· Data should be input by the minute, every time you change activity, you need to go there and input that information. This is key, and it needs to be done rigorously and with discipline. This way you always have current information and you're not stuck with having to type several days worth of information.

· The last activity of the day is called “Exit”. You only type the start time, but you must erase the formula in the “Duration” field for this activity.

· When the day ends, I like to use the “Comments” cell of the activity to add up the total hours I spent at the office that day. This is just a SUM formula that adds up the duration of all the activities. For instance in this particular day I was at the office nine and a half hours.


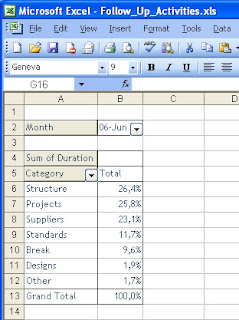
· There’s another worksheet in the Excel file, called "PT%", where I’ve added a Pivot Table report that will tell me how much time I’ve spent in each category or task. Pivot Tables are dynamic, and I can change the fields at leisure. For instance, instead of percentage, I can change it to hours.


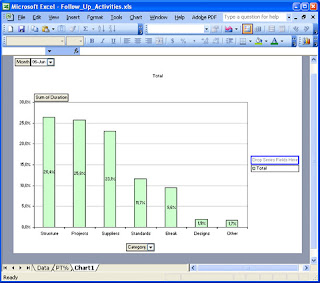
· And I’ve also added a graph to illustrate those times.


Neat, huh? Well, I think so. Do leave some comments if you have some ideas about how to improve this tool!

All the best!

Monday, September 17, 2007

Design Resources: Design Management Institute, DMI.

Hello, there, Everybody! It’s been a long while! Do forgive me, life has been hectic. Anyway…

Here’s another wonderful resource I think designers from all over the world should know about, the Design Management Institute in Boston, US.

I learned about DMI several years ago when I was on a quest to find more information about design management. As they put it:


“The Design Management Institute (DMI) is an international nonprofit organization that seeks to heighten awareness of design as an essential part of business strategy. Founded in 1975, DMI has become the leading resource and international authority on design management. DMI has earned a reputation
worldwide as a multifaceted resource, providing invaluable know-how, tools and raining through its
conferences, seminars, membership program, and publications."

The thing I like the most about DMI is that they are an unlimited source of information and education for any designer, even for us, who don’t live in the US, with the online tools (like Webinars) they’ve got.

There are also many conferences and seminars people in the US can attend. The agenda for October includes:

Design Research for Product and Service Innovation in Chicago.
Law Meets Design in New York.
From What’s Possible to What’s Right online.

Check out DMI’s calendar.


Most of the conferences and seminars are not free, but fairly priced and the topics are really interesting, because they cover design management issues that they don’t teach you at school (Or at least not my school).

Do click around their website to see all the different resources (They even have a job bank) and/or subscribe to their newsletter to get the latest news!

All the best!

Sunday, April 29, 2007

Designers beware: 5S Phase 4, Seiketsu (Standardize)

Welcome back to my series on 5S, the methodology to improve organization, order and cleanliness. In this article I cover the fourth phase, Standardize.

But first, if you’re seeing this article and haven’t read the previous four:
Introduction to the methodology
Phase one, Select
Phase two, Organize
Phase three, Clean


Phase four, Standardize

The purpose of this phase is to establish a clear standard for order and cleanliness, in order to maintain the results we achieved with the first three phases. It’s based on easily identifying an abnormal situation from a normal one. When you standardize you avoid:

- Going back to the previous conditions.
- Having work tools laying around.
- Having a disorganized work place that you have to organize again.
- Having people who after implementing Seiri and Seiso still accumulate office supplies on their desk.

And you ensure that:

- Items that don’t belong in the area are easily identified.
- The area is always organized.
- The time to find things is reduced.


Now for the steps:

Step 1: Define
There are several kinds of standards like:
- Oder standards.
- Cleanliness standards.
- Item location visual standards.
- Item quantity visual standards.
- Work place visual standards.

The word “standard” means how that particular item or area is when it’s in an ideal state. In other words, the standard illustrates the ideal state. This step is about defining how it’s supposed to be after you’ve organized and cleaned the space.


Step 2: Document
Remember I told you about documenting everything with your digital camera? Well, that’s because this would be the easiest way to show how your work space should look in an ideal state. You could also draw diagrams of where items need to be placed.

Here’s a picture of how my desk ended up once I implemented the first three phases. It was a lot better (Though not quite as good as it could be, but we’ll get to that in phase 5), so this became the first standard I implemented.


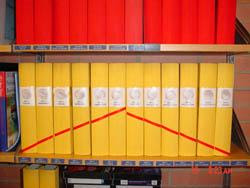
In this next example, see how it’s very easy to recognize when a folder is missing or in the wrong order?


Step 3: Train/divulge
Once you’ve set and documented the standard, you need to make sure that whoever needs to know about it, knows about it! If it’s related to your desk, then maybe you’re the only one you need to know about it. If the standard is of the supplies room, then make sure each person that uses it, knows it, understands it, and follows it. If it’s a picture, post it in a visible spot. If it’s an item quantity standard, post it near the items it relates to.

Now you can compare your current state with the standard and see if they match.

And that’s it for this phase!

But we’re not quite over yet! Meet me here next time to discuss Phase 5, Shitsuke (Improve).
All the best!

Sunday, April 08, 2007

Designers beware: 5S Phase 1, Seiri (Select)

Welcome back to my series on 5S, the methodology to improve organization, order and cleanliness.

As I said in my previous post, this methodology can be applied to many aspects of life, as you will surely see in the upcoming weeks, as I unfold the steps to use it in a design studio environment. I won’t go into a lot of depth, since the implementation does depend on your own objectives and the different places of the organization you want to tackle.

So here’s one way of implementing the methodology, CaroAyerbe style:


Let’s say you have a design studio or you work in an in-house design department. Let’s say you want to apply 5S there. The coverage would probably be the design offices and the common areas like the meeting room, the library and/or the supplies room.


Just to show you that I practice what I preach, this here was my actual desk a few years ago, yup, that's my elbow right there...


Before starting:

- Explain the methodology to your people about get a consensus on whether or not they think it’s a good idea to implement it. They always think it's good. (Come on, who doesn’t want to be more productive, right?).
- Designate a team of facilitators which will be in charge of guiding the process.
- One facilitator per area is a good idea.
- Train the facilitators.


Phase one, Select

Basically in this phase you decide what goes and what stays, that’s the main purpose. Why select? Because…

- Work places are filled with clutter.
- The usable space is used by stuff that offers no advantages.
- Closets and shelves contain things that are never used.
- It’s difficult to find the necessary utensils.
- There’s too much stock of stuff you don’t actually need.


What you will need:

- A digital camera. Humans are visual creatures, so one of the best ways to record and evaluate results is to take pictures. The before and after. Ideally, each facilitator has a camera.
- A huge plastic bag, for trash.
- Little red cards. Prepare these beforehand, it can be a little business-card-size piece of paper, with a little ribbon to attach them to objects.


Step 1: Prepare yourself.
Get a plastic bag and red cards.

Step 2: Gather.
Bring all your stuff to one place, near the area you’re working on. Take everything and put it on a big surface… on top of the desk or on the floor. Now, everything means everything. Absolutely every item needs to be accounted for.
It’s necessary to check behind closets, on top of closets, on the walls, places that are not well lit, behind the desk, inside drawers, everywhere.

Step 3: Separate.
Ok, this is where the fun starts! Once everything is in sight, divide it in two piles:

Pile A: The stuff that goes, trash, if you will. What you don’t need.
Pile B: The stuff that stays. What is actually needed or you can’t live without.

So the first pile, pile A, if it’s trash, why make it a pile? Because it’s good to take a picture, and measure how much of what you originally had, was actually garbage. So don’t discard it until the end, but do discard it; this is what the plastic bag is for. The first time we did this, we gathered 127Kg of trash.

By now you’re left with the stuff that is needed, right? Ok, now you’re going to divide that into two new piles:

Pile C: The stuff that needs to be in the work space.
Pile D: The stuff that is needed, but not in the immediate work area.

Step 4: Audit.
Once everybody has separated their materials, allow for some time (maybe half an hour) so that each person can go through other people’s stuff and question if an item should stay by attaching a red card to them. I like to leave a space in the card so that people can write a message on them, something like “do you really need three mugs for your pens?”.

Once the time is over, the person needs to decide whether or not the item goes. Nobody is allowed to remove the cards, until the fate of the item is determined.


And this is the end of phase 1; you now have selected what’s useful.


If you’re one of the facilitators, you will see that deciding what goes and what stays can be tricky for people, especially because we tend to become attached to some objects, so be prepared to deal with someone who thinks they need 7 blue markers and 8 red ones.

If you’re doing this on your own, be honest with yourself and think about what would happen if the object wasn’t there.


Meet me here next time, to talk about Seiton (Organize) and we’ll see what happens to the selected objects!

Do leave me a comment if you have any questions, I’d love to help! Also if you’re familiar with the methodology and would like to add to this article, do so as well! All your comments are welcome.

All the best!


For more information, visit my previous article which is an introduction to the methodology.

Sunday, January 28, 2007

Designers beware: Being the interviewee (Part 1)

I have already covered a designer’s resume and designer’s portfolio in this short series about designers landing a job in Latin America. In this new blog entry I will cover the interview from the interviewee perspective. I’ll divide it in two parts.


Part 1: Before the interview…

Now that you’re in “landing job” mode, it’s time to plan the strategy for your interview.


The call.
So the recruiter calls you to ask you to come over for an interview. Have a positive and upbeat attitude, act like you were expecting the call and be ready to jot down the directions to the place. It’s a good idea to take the chance to ask a couple of questions, like, who the interviewer is, their position, if they want you to bring anything else, if there’s a dress code, confirm the position they’re calling you for. In general, get as much information as possible from that call.


The research.
Once you know who’s contacted you, do some research on the company, if you haven’t already done so when you sent your resume. Check out their web page and find out as much information as you can. Try to relate that info to the design position and how it impacts their operation. DO NOT show up without doing some research. Research will allow you to prepare some intelligent questions for your interview and will save the interviewer some time in having to explain the company business to you. Trust me, you’ll make a great first impression.


The logistics.
Rehearse the route you’ll take to get to the interview location, beforehand. I know this may sound like a bit much, but making sure you get to the interview on time is of the outmost importance. In fact, leave a window to arrive there early.


The portfolio.
If you have many pieces, select the ones that better illustrate your skills for the position in question. Be prepared to present each piece by saying how it came about, what the creative process was like and how the customer’s business was improved by it.


The questions.
Interviewers ask difficult, personal and professional questions in order to see how you handle yourself under pressure and if your personality and professional traits match the position. Here are some typical questions:

- Why did you become a designer?
- What did you expect to achieve as a designer then?
- What do you expect to achieve as a designer now?
- In what type of atmosphere/environment do you feel most comfortable working in and do you do best working in groups or by yourself?
- What are your skills? What can you offer that other designers can't?
- What are your flaws?
- What’s your creative process?
- How does your expertise relate to our company?
- How do you think you’ll help us increase sales?
- What are your salary expectations?

Prepare intelligend answers for these questions and think about them thoroughly beforehand... show that you know where you're heading, what you want, your own value and how can all those positive things have a positive impact in the company.


Next time, I’ll be covering the actual interview. Until then, I look forward to receiving some comments!

All the best!

Tuesday, August 08, 2006

Designers beware of… filing systems.

When your design operation starts to go well and there are more and more customers with new projects, you will see two things:

1. You need to keep a record of your work, most of the time, digital files, digital images and all other recording materials and 2. You'll need an easy way to identify and find such materials.

As I've mentioned in previous blogs, it is very important to keep track of your projects in a database or some sort of tracking system. Such system should hold information about the location of the actual digital files of each project, and the files should be stored in an orderly fashion in said location.

Here's my method:

I organize the files by customer, so first I decide the biggest criteria to divide them, for example, country and create a folder for each country I work with. Inside each country folder I create folders for each of the customers. Then, inside each customer's folder, I create new folders according to new criteria, for instance, types of projects, sizes, media… Here's an example:


It's crucial to be consistent with your filing system and train your staff on how to file correctly. This will save you precious time when trying to locate files for an especific project (or an angry customer on the phone who claims you messed up a whole nutritional table) and it's also very valuable once you start implementing an automatic backup system.

I guess it goes without saying that backing up your files is imperative not only to have access to them, but to ensure their protection against plagiarism. There are multiple digital storage devices out there, even companies who'll do it for you following a specific method.

Now, you should come up with a way to name your digital files as well. For instance: CUSTOMER_TYPE OF JOB_TOPIC_SIZE_VERSION
"Strawberry_package.ai" just won't cut it in the long run. I also found that saving the previous versions in separate files is useful due to the fact that sometimes customers can't make up their minds about an idea. Though sometimes this uses a lot of hard drive space, you can delete them once the customer has final approved one.

In order to help yourself (or your staff) remember to file all related materials both physical and digital, I suggest you start using checklists that describe your process thorougly. These cognitive devices help people track the different steps they need to take to finish a project and store it effectively. I am a rather forgetful person, and these checklists helped me be on top of things handling a large volume of projects.

It's useful to file the checklists with the materials of the project. For instance, you can have a checklist to use when receiving materials from the customer, to check that everything you need to start working is included, and one that describes the internal design process.

Checklists call for thorough thinking, though, you don't want to have so many checklists that all your day goes by filling them out, just enough to ensure that everything is under control. Also, if your operation is bigger, like part of an in-house design team, there might be checklists for different parts of the projects, or checklists to communicate with other departments, so analyze your process before implementing too many controls.

If the department is just starting out, start small, using a checklist to control a small portion of the process. Avoid going electronic at first. I found that an electronic checklist will only work if it has been previously tested with pen and paper.

It all has to do with being in control of your operation and being aware of what's happening with each of the projects and their related materials, but keep it simple.

In short:

- Store digital files in identifyable folders.
- Store physical materials in identifyable devices also.
- Be smart about naming your digital files.
- Create checklists to add control points to certain steps of your process.

All the best!

Designers beware of… technology and supplies.

When running a design office or a design department, you need to assess the kind of equipment you'll be needing and the supplies you'll be using on a daily basis.

If you're starting out, you need to decide the extent of your operation, research the types of activities you'll be performing, so that you can assign a budget for your equipment. Try to figure out how long it'll be before you have to update your hardware and software and take this into consideration when managing your current budget and the budget of the upcoming years.

Also, beware that technology changes too fast in these times. Subscribe to a technology magazine or newsletters and be constantly aware of new developments that can make your work easier of more efficient, or new things that you can offer to your clients. A great one for we designers is Macworld (www.macworld.com). Joining a few technology forums in Ecademy or other platforms is also a great way of being up to date and asking people around for the latest and greatest.

Less expensive items like general office supplies also need to be accounted for. Measure their use and unless you have an unlimited budget for this, try to recycle and get the best of them. You don't always know when you're going to run out of printer cartridges or glossy paper.

All the best!

Designers beware of… production lines.

Once you've completed your design process, it goes to production. Whether it's printing, packaging or product design, you need to be knowledgeable about the production process, in detail.

Suppliers are more than happy to help most of the time, they will explain technical specifications (they will even share molds or keylines) and suggest better ways to handle the design in order to make the most of the process. Knowing about it will give you more authority to assess design issues with clients as well as avoid potential problems during production. If you can, spend a few days in the factory or production line, so that you understand the process thoroughly. Ask many questions.

Take a look into products that have been made using the same production techniques and evaluate how much you can push the boundaries of your design. Learn about the quantity of items to be produced and the budget to do it. These factors may play a key role in how the design should be tackled, for instance, can you produce two different designs at the same time? Is there a limited number of colors available according to the price? What's the minimum/maximum quantity that can be produced in a predefined time?

It's also a very good idea to create mock-ups, specially in product or package design.

Despite all of the above, clarify responsibilities with your client and suppliers. While I'm saying you need to be knowledgeable in the production process, take into consideration that specifications, legal requirements and other production issues should be addressed by them.

All the best!

Designers beware of… time measurement.

Have you even been one of those people that at the end of a long day go "I worked my butt off all day and still I didn't get to do what was important, I feel like I didn't do anything at all…" Well, you may need to start measuring your time.

In my experience I found that there are several kinds of activities, for instance, true added value activities like strategic planning, chore activities like entering invoicing information into a collection system, annoying activities with no added value like burning CDs for other people and personal activities like breaks, lunch or cooler talks, to name a few.

It is important to know how much time you're spending in these activities. Why? Here are a few reasons:

- Because you may be spending a little too much time in activities that add no value to your operation.

- Because you may encounter that you can delegate certain activities to your employees, which not only would empower them, but free time for you to spend in more added value activities.

- Because you may find that it's more effective to hire a consultant to take care of certain time consuming activities or you may even ask for your suppliers to absorb such activities which would make your operation even more effective.

- Because you need to be aware of how long do your typical projects take, in order to have an accurate planning, and how much to charge.

- Because you can plan more strategically ahead of time so that you know if you need to get some outside help for that big project that will be coming next week or if you have some free time to spend on leadership activities with your staff. In other words, when you know how long will your projects take and how they're organized in any given time frame, you get a broader vision of your business.

So here's how I go about it:

- First, get your staff involved, so that the data collection is very accurate.

- Make a list of all the activities you and your staff are performing. Everything from creative meetings to smoking a cigarette, from the time you enter the office to the time you leave. Try not to leave anything out.

- Assign categories to the activities, for instance, a creative meeting and meetings with customers will go under "meetings" or "strategy". It depends on your particular needs and activities.

- Create an Excel table to enter the information with time and date and how long each activity took. For example:

You can set up the Excel table to count the time spent in each category and start analyzing the information, after you've collected it.

- Once you add up the time at the end of a predefined time frame, for instance, a week or a month, you can being to make some choices.

Depending on how many people work for you or your strategic plan, perhaps you want to start with your own activities first and then start measuring the staff according to their tasks, like, first the graphic designers and then, the sales people… it's your call, you define the criteria.

The first time I tried this methodology I found that 40% of my time was spent scanning pictures and burning CDs for other people (We were the only department in the company that had CD burners and a scanner, back in the day). This lead me to suggest to my boss that maybe somebody else (his assistant?) could take care of such activities if he invested a bit of money for the hardware, which would allow me to use that precious time attending to the clients requests.

All the best!

Update: To learn further about how to use the Excel activity tracking tool, go to my article about it, from October 30th, 2007.

Designers beware of… finances.

Money is involved in everything (Well, almost). Design is no exception. When it comes to design, you need to be aware of the costs you have when you're "designing" in order to be able to reduce them, to establish prices, to establish goals and to check if you're operation is actually bringing back some cash.

Along with costs, you need to be aware of your sales and how those are related to the costs you have. In order to "be aware" you need to measure, as my former boss used to say: "What you don't measure, you don't know". In order to measure, you need to establish some data collection, a database or some sort of system that will allow you to keep track of your projects, what went in, what came out. In the beginning I used to do this using File Maker, but a basic Excel table will do. You just need to be disciplined and enter the information rigorously.

So, in short:

- Set up a tracking system, not only to keep track of your design traffic, but to keep track of your costs and sales.

- Measure how much you're spending in the operation (Yes, including the coffee you drink).

- Measure how much you're selling.

- Establish some goals, like reducing costs and increasing sales.

- Follow up and review periodically, about once a week or twice a month.

If you're a flying solo designer, this operation is rather simple, though you may want to get some advice from an accountant or some finance professional.

If you're part of an in-house design department, you need to be aware of your operation and its performance related to the whole company. The finance department is usually happy to help.

If you have your own design studio, consider hiring a financial advisor, but don't leave all up to them, get involved.

All the best!