Showing posts with label filing. Show all posts

Saturday, May 05, 2007

Designers beware: 5S Phase 5, Shitsuke (Improve)

Welcome back to my series on 5S, the methodology to improve organization, order and cleanliness. In this article I cover the fifth phase, Improve. If you’ve made it this far, allow me to congratulate you!

But first, if you’re seeing this article and haven’t read the previous four:
Introduction to the methodology
Phase one, Select
Phase two, Organize
Phase three, Clean
Phase four, Standardize


Phase five, Improve

The purpose of this phase is to maintain the achieved conditions and establish new goals for improvement. When you improve you:

- Keep the order that you achieved during Seiton.
- Items return to their assigned place.
- Hardware and workstations are cleaned regularly.
- People enjoy a great work environment and are proud of their places of work.


And the steps:

Step 1: Redefine
You’d establish a standard, right? Now go back to the questions you asked yourself during phases 1 and 2 and ask them again against your current standard. Is there anything that can be done better? Something that doesn’t need to be in the work space?


Step 2: Document
Once you’ve gone through the questions again, see if the standard changed. If so, document again, take a new picture and post it in a visible place.

Here is a picture of the final standard for my desk, though I later on replaced the CD burner for an internal drive. Where are the pens you ask? Neatly stowed away in the drawers.


As a bonus, here I’m showing you a picture of my current desk, still applying the 5S philosophy.


This is my pencil box. It includes only what’s needed. Black, blue and red pens, a pencil, a highlighter and a calendar (Though now that I think about it, does the calendar need to be there? I have one in my computer dashboard… hmm…)


Step 3: Audit
Ok, so by now everybody in the organization has their standards. It’s time to audit their implementation. How to measure and evaluate progress is really up to the team and the criteria they want to apply.

Here’s an example I’ve used to audit offices. We did it weekly, for about a month.

Criteria to evaluate in each step:

Select
I haven’t selected anything (Earns 1 point).
I’ve selected some things (Earns 2 points).
I have only what I need (Earns 3 points).

Organize
I haven’t organized anything (Earns 1 point).
I’ve organized some things (Earns 2 points).
Every item has and is in its place (Earns 3 points).

Clean
I haven’t cleaned anything (Earns 1 point).
I’ve cleaned some things (Earns 2 points).
My work place is clean (Earns 3 points).

Standardize
I haven’t standardized anything (Earns 1 point).
I’ve established the standard (Earns 2 points).

Improve
I’ve improved the standard once (Earns 1 point).
I’ve improved the standard twice (Earns 2 points).
I’ve improved the standard three times or more (Earns 3 points).


Here’s an example of an Excel table to record and count the points:
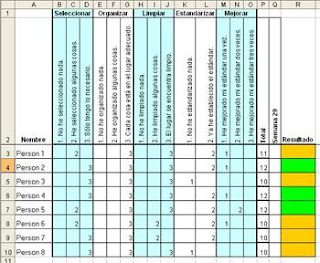

After counting the points the person gets a card:

Red card, if the person earned between 5 and 10 points. There’s big room for improvement here.

Yellow card, if the person earned between 10 and 12 points. There’s still room for improvement.

Green card, if the person earned between 12 and 14 points. The work space is very neat and clean!

The idea is for the cards to be displayed in the work area so that maybe a little competition between the people in the team sparks up to get to green in the four weeks of the audit process.

And that’s it for this phase and for the 5S!

It’s a good idea to repeat the audit process in a few months, to see if the team keeps the new conditions.

I hope you’ve enjoyed this series and that your workplaces are areas of productiveness and pride!
All the best!

Sunday, April 29, 2007

Designers beware: 5S Phase 4, Seiketsu (Standardize)

Welcome back to my series on 5S, the methodology to improve organization, order and cleanliness. In this article I cover the fourth phase, Standardize.

But first, if you’re seeing this article and haven’t read the previous four:
Introduction to the methodology
Phase one, Select
Phase two, Organize
Phase three, Clean


Phase four, Standardize

The purpose of this phase is to establish a clear standard for order and cleanliness, in order to maintain the results we achieved with the first three phases. It’s based on easily identifying an abnormal situation from a normal one. When you standardize you avoid:

- Going back to the previous conditions.
- Having work tools laying around.
- Having a disorganized work place that you have to organize again.
- Having people who after implementing Seiri and Seiso still accumulate office supplies on their desk.

And you ensure that:

- Items that don’t belong in the area are easily identified.
- The area is always organized.
- The time to find things is reduced.


Now for the steps:

Step 1: Define
There are several kinds of standards like:
- Oder standards.
- Cleanliness standards.
- Item location visual standards.
- Item quantity visual standards.
- Work place visual standards.

The word “standard” means how that particular item or area is when it’s in an ideal state. In other words, the standard illustrates the ideal state. This step is about defining how it’s supposed to be after you’ve organized and cleaned the space.


Step 2: Document
Remember I told you about documenting everything with your digital camera? Well, that’s because this would be the easiest way to show how your work space should look in an ideal state. You could also draw diagrams of where items need to be placed.

Here’s a picture of how my desk ended up once I implemented the first three phases. It was a lot better (Though not quite as good as it could be, but we’ll get to that in phase 5), so this became the first standard I implemented.


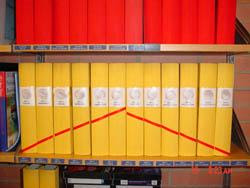
In this next example, see how it’s very easy to recognize when a folder is missing or in the wrong order?


Step 3: Train/divulge
Once you’ve set and documented the standard, you need to make sure that whoever needs to know about it, knows about it! If it’s related to your desk, then maybe you’re the only one you need to know about it. If the standard is of the supplies room, then make sure each person that uses it, knows it, understands it, and follows it. If it’s a picture, post it in a visible spot. If it’s an item quantity standard, post it near the items it relates to.

Now you can compare your current state with the standard and see if they match.

And that’s it for this phase!

But we’re not quite over yet! Meet me here next time to discuss Phase 5, Shitsuke (Improve).
All the best!

Sunday, April 15, 2007

Designers beware: 5S Phase 2, Seiton (Organize)

Welcome back to my series on 5S, the methodology to improve organization, order and cleanliness. In this article I cover the second phase, Organize.

But first, if you want to go back to the two previous articles:
Introduction to the methodology
Phase one, Select

Let’s pick up where we left off. Last week I talked about Seiri, to select. At the end of the exercise we had two piles of stuff:

Pile C: The stuff that needs to be in the work space.
Pile D: The stuff that is needed, but not in the immediate work area.


Phase two, Organize

The purpose of this phase is to assign the correct place for each item.

- This will eliminate unnecessary movement because the needed elements are nearby.
- You’ll find elements quicker.
- Error is reduced.
- There are visible clues of where the elements are placed and their quantity.
- The basis for standardization is laid out.


Now for the exercise:

Step 1: Classify
Think about how often you use each item according to the following criteria:

- Infrequent: Things that are used monthly. These can be placed further from the working area.
- Frequent: Things that are used weekly. These can be placed inside the nearby area.
- Very frequent: Things that are used daily. These should be placed in the working area.


Step 2: Quantify
Determine how much of each item is needed in the place where they will be stored. For instance, you may need one black marker on your desk, not five, so the other four can go to the supplies room. Now how many should there be in the supplies room?


Step 3: Place
Determine the exact place where each item goes according to the task they’re used for. Elements needed for the task performed in the specific work area should be inside it.

Group elements according to:
- Process, if they’re used during a specific task, keep them together.
- Function, things that are used for the same purpose, should be kept together.
- Order, things that are used in a certain order, should be placed in a way that will reflect it.


Step 4: Evaluate
Ask yourself:
- Is it obvious when something is missing from its spot?
- Is it obvious when something is there, that shouldn’t be there?
- Do the objects that can be moved, return to their spot?
- Is it visible when you’re running out of supplies?

This step could even include visual clues like contour lines around the spot where things are stored, tags, or quantity indicators to show the maximum amount and the minimum amount so that a new order can be placed.


* This image from the eBook “Estrategia de las 5S” produced by Advanced Productive Solutions, S.L. www.ceroaverias.com


Step 5: Audit
Once everybody has decided the place where everything goes, allow for some extra time, perhaps half an hour, so that everybody can question each other using red labels again. All items marked with red labels need to be relocated within the next few days.


Some additional thoughts:

It is likely that by now you’ve realized that you don’t actually need some of the things you thought you needed. In that case, you can do any of the following actions:

- Store it somewhere else.
- Move it inside the area.
- Sell it.
- Rent it.
- Return it.
- Trash it.

If it’s not needed for the task, it shouldn’t be there. Ideally the only things that should be on a desk is the computer, the immediate supplies like a pen and paper, and the stuff that you’re currently working on. Extra supplies can go in drawers.
Also, don’t forget to document the process with your digital camera.

I want to point out that in the cases of personal offices and desks, 5S is a process that every person needs to assimilate in their own way. Some people are attached to objects that for others have no significant value and this needs to be respected. Each person should take 5S as far as they feel is comfortable for them. For instance, I don’t need to have pictures of every member of my family on my desk; some people do. So beware that everybody has their own pace and nobody is allowed to decide for somebody else in this methodology.

So that’s all for today. Join me here next time to cover Phase 3, Seiso (Clean).

In the meantime let me leave you with this thought: Do you think this can be applied to, say, email, your computer desktop, the closet, the pantry?

All the best!

Sunday, April 08, 2007

Designers beware: 5S Phase 1, Seiri (Select)

Welcome back to my series on 5S, the methodology to improve organization, order and cleanliness.

As I said in my previous post, this methodology can be applied to many aspects of life, as you will surely see in the upcoming weeks, as I unfold the steps to use it in a design studio environment. I won’t go into a lot of depth, since the implementation does depend on your own objectives and the different places of the organization you want to tackle.

So here’s one way of implementing the methodology, CaroAyerbe style:


Let’s say you have a design studio or you work in an in-house design department. Let’s say you want to apply 5S there. The coverage would probably be the design offices and the common areas like the meeting room, the library and/or the supplies room.


Just to show you that I practice what I preach, this here was my actual desk a few years ago, yup, that's my elbow right there...


Before starting:

- Explain the methodology to your people about get a consensus on whether or not they think it’s a good idea to implement it. They always think it's good. (Come on, who doesn’t want to be more productive, right?).
- Designate a team of facilitators which will be in charge of guiding the process.
- One facilitator per area is a good idea.
- Train the facilitators.


Phase one, Select

Basically in this phase you decide what goes and what stays, that’s the main purpose. Why select? Because…

- Work places are filled with clutter.
- The usable space is used by stuff that offers no advantages.
- Closets and shelves contain things that are never used.
- It’s difficult to find the necessary utensils.
- There’s too much stock of stuff you don’t actually need.


What you will need:

- A digital camera. Humans are visual creatures, so one of the best ways to record and evaluate results is to take pictures. The before and after. Ideally, each facilitator has a camera.
- A huge plastic bag, for trash.
- Little red cards. Prepare these beforehand, it can be a little business-card-size piece of paper, with a little ribbon to attach them to objects.


Step 1: Prepare yourself.
Get a plastic bag and red cards.

Step 2: Gather.
Bring all your stuff to one place, near the area you’re working on. Take everything and put it on a big surface… on top of the desk or on the floor. Now, everything means everything. Absolutely every item needs to be accounted for.
It’s necessary to check behind closets, on top of closets, on the walls, places that are not well lit, behind the desk, inside drawers, everywhere.

Step 3: Separate.
Ok, this is where the fun starts! Once everything is in sight, divide it in two piles:

Pile A: The stuff that goes, trash, if you will. What you don’t need.
Pile B: The stuff that stays. What is actually needed or you can’t live without.

So the first pile, pile A, if it’s trash, why make it a pile? Because it’s good to take a picture, and measure how much of what you originally had, was actually garbage. So don’t discard it until the end, but do discard it; this is what the plastic bag is for. The first time we did this, we gathered 127Kg of trash.

By now you’re left with the stuff that is needed, right? Ok, now you’re going to divide that into two new piles:

Pile C: The stuff that needs to be in the work space.
Pile D: The stuff that is needed, but not in the immediate work area.

Step 4: Audit.
Once everybody has separated their materials, allow for some time (maybe half an hour) so that each person can go through other people’s stuff and question if an item should stay by attaching a red card to them. I like to leave a space in the card so that people can write a message on them, something like “do you really need three mugs for your pens?”.

Once the time is over, the person needs to decide whether or not the item goes. Nobody is allowed to remove the cards, until the fate of the item is determined.


And this is the end of phase 1; you now have selected what’s useful.


If you’re one of the facilitators, you will see that deciding what goes and what stays can be tricky for people, especially because we tend to become attached to some objects, so be prepared to deal with someone who thinks they need 7 blue markers and 8 red ones.

If you’re doing this on your own, be honest with yourself and think about what would happen if the object wasn’t there.


Meet me here next time, to talk about Seiton (Organize) and we’ll see what happens to the selected objects!

Do leave me a comment if you have any questions, I’d love to help! Also if you’re familiar with the methodology and would like to add to this article, do so as well! All your comments are welcome.

All the best!


For more information, visit my previous article which is an introduction to the methodology.

Sunday, February 18, 2007

Designers beware: 10 tips on writing emails.

If there’s one thing a designer cannot afford to be is sloppy. Ever. And we designers tend to be a bit sloppy about communication and we tend to believe that whoever doesn’t speak “design tongue” is kind of dumb.

But think again, as I’ve exposed before, it is we, the designers, that need to start expressing in the language of the people we serve.

One of the most used tools of communication for designers is of course, email. Numerous versions of blueprints and projects are sent every day, iterations, discussions about budgets, deadlines, look and feel, corrections, revisions…

It is crucial that we manage email effectively in order to not drown in our own sea of email and communicate a clear message that will help design processes run smoothly. So here are ten tips to effectively handle email:


Tip 1: Be smart about subject lines.
The subject line should provide as much information as possible about the content of the email. Be descriptive and avoid laziness. Include if applicable, the name of the customer, the project, the specific part of the project, the version, if any action needs to be taken. For example:
Nike Running Shoes Ad blueprint, version 04. Comments are expected by tomorrow noon.

I’ve literally received emails with “design” or “strawberry” in the subject line.
Another thing is to update the subject line every time you reply. As the message evolves, so should the subject line.

If there are emails that you constantly send, that have the same structure, come up with a nomenclature for them. For instance, if you send a budget update every two weeks, your subject line could be: "Nike Campaign, Budget Update for February 20th, 2007", where you would only change the date every time you send it. This makes it easier for you and your readers to archive.

You could even come up with some abbreviations to add at the end of the subject line, inside the organization. For example: AR=action required; EOM=end of message; CE=comments expected. This will help other people know up front if there’s something they need to do about it.


Tip 2: Be brief and to the point.
Bottom line up front, state the purpose of the email and the actions required in the first paragraph. This will allow the reader to decide whether they need to continue reading or not. If the emails is more than three paragraphs long, it’s better to call and follow up with a summary email.


Tip 3: Be clear on what the next step is.
And include this information in the subject line or first paragraph if possible. Tell the reader if an action is required of them and state a deadline for that action to be taken. If no action is required, inform that also. You could start the message with “fyi” which means that the email is sent only as information.


Tip 4: There are no urgent emails.
If something is urgent and needs immediate attention, call, and then follow up with an email.


Tip 5: Present ideas in a simple, easy to understand way.
As I said in a previous post:
“This is particularly important when sending emails and explaining design issues in writing. It is very easy for a customer to get confused when he receives an email and it’s not well written. Revise how much detail you want to go into when discussing matters with your clients. Little detail and you won’t be able to convey your message, too much detail and it’s likely that your counterpart will get confused.”

Also help the reader with visual aids whenever needed. Highlight issues with different colors if you need to draw attention to them. Use bullets to list things. Another thing I like to do is take a picture (JPG or PDF) of a given design and use Photoshop to circle the areas I want to discuss. I assign a number to each area and then I explain each of the numbers in writing.

Make sure your emails comply with IP Standards (Idiot Proof Standards, that is, meaning that anything that needs a manual to be understood, is not well designed).


Tip 6: Mind your spelling and grammar.
As I said in a previous post:
“Grammar and spelling do speak about your professionalism, so be aware of the image you’re presenting. Check emails for errors or typos before sending them and make sure your staff does the same.”

Tip 7: Never forward junk or chain emails.
It’s plain unprofessional and goes against the trust customers and people in general, have in you.


Tip 8: Use a signature.
One that includes your name, position and contact details. If you’re part of a design organization, standardize it and make sure everybody uses the same. This reinforces your brand and it looks professional.


Tip 9: Be professional about email.
Do not use email to solve disputes. It is always better to use personal communication first.
Don’t use email to tell on other people.
Don’t use it as a mechanism to track actions.


Tip 10: Archive your email.
In a business where there are so many subjective issues, it’s a good idea to follow up discussions and agreements with something in writing. Come up with a good archiving system to file your email and make sure you can locate it easily afterwards. Use email client rules to help you file more quickly. I’ve talked about filing systems before. Some of this principles apply to archiving email.

I look forward to receiving some comments!
All the best.


Tuesday, August 08, 2006

Designers beware of… filing systems.

When your design operation starts to go well and there are more and more customers with new projects, you will see two things:

1. You need to keep a record of your work, most of the time, digital files, digital images and all other recording materials and 2. You'll need an easy way to identify and find such materials.

As I've mentioned in previous blogs, it is very important to keep track of your projects in a database or some sort of tracking system. Such system should hold information about the location of the actual digital files of each project, and the files should be stored in an orderly fashion in said location.

Here's my method:

I organize the files by customer, so first I decide the biggest criteria to divide them, for example, country and create a folder for each country I work with. Inside each country folder I create folders for each of the customers. Then, inside each customer's folder, I create new folders according to new criteria, for instance, types of projects, sizes, media… Here's an example:


It's crucial to be consistent with your filing system and train your staff on how to file correctly. This will save you precious time when trying to locate files for an especific project (or an angry customer on the phone who claims you messed up a whole nutritional table) and it's also very valuable once you start implementing an automatic backup system.

I guess it goes without saying that backing up your files is imperative not only to have access to them, but to ensure their protection against plagiarism. There are multiple digital storage devices out there, even companies who'll do it for you following a specific method.

Now, you should come up with a way to name your digital files as well. For instance: CUSTOMER_TYPE OF JOB_TOPIC_SIZE_VERSION
"Strawberry_package.ai" just won't cut it in the long run. I also found that saving the previous versions in separate files is useful due to the fact that sometimes customers can't make up their minds about an idea. Though sometimes this uses a lot of hard drive space, you can delete them once the customer has final approved one.

In order to help yourself (or your staff) remember to file all related materials both physical and digital, I suggest you start using checklists that describe your process thorougly. These cognitive devices help people track the different steps they need to take to finish a project and store it effectively. I am a rather forgetful person, and these checklists helped me be on top of things handling a large volume of projects.

It's useful to file the checklists with the materials of the project. For instance, you can have a checklist to use when receiving materials from the customer, to check that everything you need to start working is included, and one that describes the internal design process.

Checklists call for thorough thinking, though, you don't want to have so many checklists that all your day goes by filling them out, just enough to ensure that everything is under control. Also, if your operation is bigger, like part of an in-house design team, there might be checklists for different parts of the projects, or checklists to communicate with other departments, so analyze your process before implementing too many controls.

If the department is just starting out, start small, using a checklist to control a small portion of the process. Avoid going electronic at first. I found that an electronic checklist will only work if it has been previously tested with pen and paper.

It all has to do with being in control of your operation and being aware of what's happening with each of the projects and their related materials, but keep it simple.

In short:

- Store digital files in identifyable folders.
- Store physical materials in identifyable devices also.
- Be smart about naming your digital files.
- Create checklists to add control points to certain steps of your process.

All the best!