Showing posts with label costs. Show all posts

Tuesday, October 30, 2007

Time Tracking Tool

Like most designers, I hated Excel. Then one day the best boss I ever had (an engineer, by the way) introduced me to the wonderful world of spreadsheets.

Excel is a very powerful tool once you get to know it. I don’t know that much, actually, but I have developed a few tools to keep track of design traffic and time. Last year I wrote about time measurement and mentioned briefly how to go about tracking time and tasks.

Today I want to go deeper and share with you a tool I created to track the time and activities you do on a daily basis.

It’s pretty simple. With it you can:

· Establish categories for your activities.
· Know how much time you’re spending in such activities, and filter by category.
· Find out if you’re wasting time in meaningless tasks.
· Find out if there are tasks you can delegate, empowering your employees.
· Measure how much time you’re spending at the office.

Also, as I said in the article I mentioned earlier:

You may find that it's more effective to hire a consultant to take care of certain time consuming activities or you may even ask for your suppliers to absorb such activities which would make your operation even more effective.

You need to be aware of how long do your typical projects take, in order to have accurate planning, and how much to charge.

You can plan more strategically ahead of time so that you know if you need to get some outside help for that big project that will be coming next week or if you have some free time to spend on leadership activities with your staff. In other words, when you know how long will your projects take and how they're organized in any given time frame, you get a broader vision of your business.


So without further ado, here’s the tool and the instructions:

I call it my "Follow Up Activities" spreadsheet. You can download the Excel file here. This is the file as I use it, and this file has been filled for activities for five days, as an example, but feel free to adapt it to your needs!
It’s basically a table with the following fields: Month, Day, Start, Duration, Category, Description and Comments.
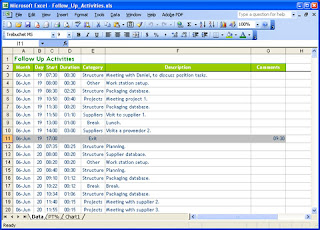


Month: This is a text field. I like to name it "00-mmm" where “00” is the number of the month (for instance June would be 06) and “mmm” is the first three letters of the month’s name. Why? Because it allows me to sort by number of the month, instead of the name, so that January will always be at the top, for example.

Day: This is a number field. Type number of the current day.

Start: This is a date/hour field. Type the hour of the day in which that particular activity started, in 24 hour format.

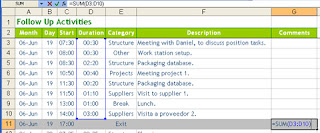
Duration: It’s a date/hour field, with a formula where the duration of the activity is calculated by the starting time of the following task minus the starting time of the previous task. In the picture above the formula would be =C4-C3 for the first cell and then that is copied down on the cells of the D column.

Category: This is a text field. You define the categories of activities. In this example I’ve created seven categories. There’s one called “Breaks” where I record the times I spend on breaks and lunches.

Description: This is a text field. Type a description of the task. I use the same name for the same activity for example I always write “Packaging database” for that particular activity instead of using several different names for it.

Comments: This is a text field. If you wish to add something else like who you met with or if the project was billed, etc.


Now for some instructions:

· Data should be input by the minute, every time you change activity, you need to go there and input that information. This is key, and it needs to be done rigorously and with discipline. This way you always have current information and you're not stuck with having to type several days worth of information.

· The last activity of the day is called “Exit”. You only type the start time, but you must erase the formula in the “Duration” field for this activity.

· When the day ends, I like to use the “Comments” cell of the activity to add up the total hours I spent at the office that day. This is just a SUM formula that adds up the duration of all the activities. For instance in this particular day I was at the office nine and a half hours.


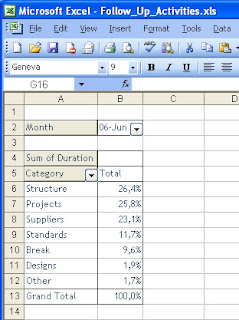
· There’s another worksheet in the Excel file, called "PT%", where I’ve added a Pivot Table report that will tell me how much time I’ve spent in each category or task. Pivot Tables are dynamic, and I can change the fields at leisure. For instance, instead of percentage, I can change it to hours.


· And I’ve also added a graph to illustrate those times.
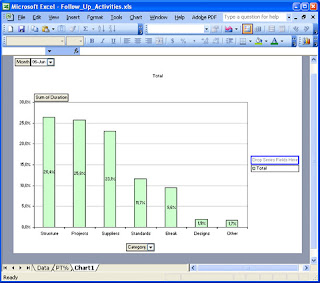

Neat, huh? Well, I think so. Do leave some comments if you have some ideas about how to improve this tool!

All the best!

Saturday, May 05, 2007

Designers beware: 5S Phase 5, Shitsuke (Improve)

Welcome back to my series on 5S, the methodology to improve organization, order and cleanliness. In this article I cover the fifth phase, Improve. If you’ve made it this far, allow me to congratulate you!

But first, if you’re seeing this article and haven’t read the previous four:
Introduction to the methodology
Phase one, Select
Phase two, Organize
Phase three, Clean
Phase four, Standardize


Phase five, Improve

The purpose of this phase is to maintain the achieved conditions and establish new goals for improvement. When you improve you:

- Keep the order that you achieved during Seiton.
- Items return to their assigned place.
- Hardware and workstations are cleaned regularly.
- People enjoy a great work environment and are proud of their places of work.


And the steps:

Step 1: Redefine
You’d establish a standard, right? Now go back to the questions you asked yourself during phases 1 and 2 and ask them again against your current standard. Is there anything that can be done better? Something that doesn’t need to be in the work space?


Step 2: Document
Once you’ve gone through the questions again, see if the standard changed. If so, document again, take a new picture and post it in a visible place.

Here is a picture of the final standard for my desk, though I later on replaced the CD burner for an internal drive. Where are the pens you ask? Neatly stowed away in the drawers.


As a bonus, here I’m showing you a picture of my current desk, still applying the 5S philosophy.


This is my pencil box. It includes only what’s needed. Black, blue and red pens, a pencil, a highlighter and a calendar (Though now that I think about it, does the calendar need to be there? I have one in my computer dashboard… hmm…)


Step 3: Audit
Ok, so by now everybody in the organization has their standards. It’s time to audit their implementation. How to measure and evaluate progress is really up to the team and the criteria they want to apply.

Here’s an example I’ve used to audit offices. We did it weekly, for about a month.

Criteria to evaluate in each step:

Select
I haven’t selected anything (Earns 1 point).
I’ve selected some things (Earns 2 points).
I have only what I need (Earns 3 points).

Organize
I haven’t organized anything (Earns 1 point).
I’ve organized some things (Earns 2 points).
Every item has and is in its place (Earns 3 points).

Clean
I haven’t cleaned anything (Earns 1 point).
I’ve cleaned some things (Earns 2 points).
My work place is clean (Earns 3 points).

Standardize
I haven’t standardized anything (Earns 1 point).
I’ve established the standard (Earns 2 points).

Improve
I’ve improved the standard once (Earns 1 point).
I’ve improved the standard twice (Earns 2 points).
I’ve improved the standard three times or more (Earns 3 points).


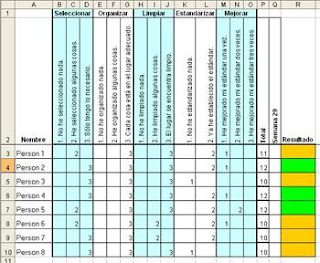
Here’s an example of an Excel table to record and count the points:


After counting the points the person gets a card:

Red card, if the person earned between 5 and 10 points. There’s big room for improvement here.

Yellow card, if the person earned between 10 and 12 points. There’s still room for improvement.

Green card, if the person earned between 12 and 14 points. The work space is very neat and clean!

The idea is for the cards to be displayed in the work area so that maybe a little competition between the people in the team sparks up to get to green in the four weeks of the audit process.

And that’s it for this phase and for the 5S!

It’s a good idea to repeat the audit process in a few months, to see if the team keeps the new conditions.

I hope you’ve enjoyed this series and that your workplaces are areas of productiveness and pride!
All the best!

Sunday, April 15, 2007

Designers beware: 5S Phase 2, Seiton (Organize)

Welcome back to my series on 5S, the methodology to improve organization, order and cleanliness. In this article I cover the second phase, Organize.

But first, if you want to go back to the two previous articles:
Introduction to the methodology
Phase one, Select

Let’s pick up where we left off. Last week I talked about Seiri, to select. At the end of the exercise we had two piles of stuff:

Pile C: The stuff that needs to be in the work space.
Pile D: The stuff that is needed, but not in the immediate work area.


Phase two, Organize

The purpose of this phase is to assign the correct place for each item.

- This will eliminate unnecessary movement because the needed elements are nearby.
- You’ll find elements quicker.
- Error is reduced.
- There are visible clues of where the elements are placed and their quantity.
- The basis for standardization is laid out.


Now for the exercise:

Step 1: Classify
Think about how often you use each item according to the following criteria:

- Infrequent: Things that are used monthly. These can be placed further from the working area.
- Frequent: Things that are used weekly. These can be placed inside the nearby area.
- Very frequent: Things that are used daily. These should be placed in the working area.


Step 2: Quantify
Determine how much of each item is needed in the place where they will be stored. For instance, you may need one black marker on your desk, not five, so the other four can go to the supplies room. Now how many should there be in the supplies room?


Step 3: Place
Determine the exact place where each item goes according to the task they’re used for. Elements needed for the task performed in the specific work area should be inside it.

Group elements according to:
- Process, if they’re used during a specific task, keep them together.
- Function, things that are used for the same purpose, should be kept together.
- Order, things that are used in a certain order, should be placed in a way that will reflect it.


Step 4: Evaluate
Ask yourself:
- Is it obvious when something is missing from its spot?
- Is it obvious when something is there, that shouldn’t be there?
- Do the objects that can be moved, return to their spot?
- Is it visible when you’re running out of supplies?

This step could even include visual clues like contour lines around the spot where things are stored, tags, or quantity indicators to show the maximum amount and the minimum amount so that a new order can be placed.


* This image from the eBook “Estrategia de las 5S” produced by Advanced Productive Solutions, S.L. www.ceroaverias.com


Step 5: Audit
Once everybody has decided the place where everything goes, allow for some extra time, perhaps half an hour, so that everybody can question each other using red labels again. All items marked with red labels need to be relocated within the next few days.


Some additional thoughts:

It is likely that by now you’ve realized that you don’t actually need some of the things you thought you needed. In that case, you can do any of the following actions:

- Store it somewhere else.
- Move it inside the area.
- Sell it.
- Rent it.
- Return it.
- Trash it.

If it’s not needed for the task, it shouldn’t be there. Ideally the only things that should be on a desk is the computer, the immediate supplies like a pen and paper, and the stuff that you’re currently working on. Extra supplies can go in drawers.
Also, don’t forget to document the process with your digital camera.

I want to point out that in the cases of personal offices and desks, 5S is a process that every person needs to assimilate in their own way. Some people are attached to objects that for others have no significant value and this needs to be respected. Each person should take 5S as far as they feel is comfortable for them. For instance, I don’t need to have pictures of every member of my family on my desk; some people do. So beware that everybody has their own pace and nobody is allowed to decide for somebody else in this methodology.

So that’s all for today. Join me here next time to cover Phase 3, Seiso (Clean).

In the meantime let me leave you with this thought: Do you think this can be applied to, say, email, your computer desktop, the closet, the pantry?

All the best!

Sunday, April 01, 2007

Designers beware: 5 steps to productivity, the 5S.

How would you like to be more productive and have a better workplace? Would you believe me if I said that you can achieve that easily with little or no investment at all?

Would you be able to work here? Do you actually work in a place like this?


Would you like to live like this? Do you currently?


A few years ago, when I was part of the continuous improvement team of the company I worked for, I was entrusted with the task of implementing a certain methodology that promised to improve our productivity. So of course, I had to be the first to test it.

It changed me. I’ll never go back to the way I was before, immersed in clutter, with a feeling of not having any control over my stuff, my activities, my life! Being tired before even starting to work, just by glancing at my desk.

5S (Five eses, if you will) is a methodology that was developed by Japanese companies, mainly Toyota, to improve organization, order and cleanliness in work stations. It can be as extensive as you wish it to be, with thorough measurements of improvement in machinery performance in factory conditions, but as I’ll present in the upcoming posts, it can be applied to almost every aspect of life, yes, the design business included.


What can 5S do for you? Keep reading…

The name 5S responds to five Japanese words that describe each of the five steps:

1. Seiri (Select)
Identify and separate the necessary from the unnecessary items.

2. Seiton (Organize)
Everything has its place.

3. Seiso (Clean)
Identify and eliminate sources of dirt and clutter.

4. Seiketsu (Standardize)
Maintain the status of order and cleanliness achieved.

5. Shitsuke (Improve)
Make it a habit and reach new standards of order and cleanliness.


5S can be defined as an ideal state in which:

- Unnecessary materials or utensils have been eliminated.
- Everything has been identified and been assigned a place.
- Clutter has been eliminated.
- There are visual references to control the status of processes.
- All this is maintained and continuously improved.


By implementing 5S you will:

- Reduce errors.
- Reduce supplies inventory.
- Reduce unnecessary movement.
- Gain more space.
- Be proud of your work place.
- Easily recognize the status of things.
- Quickly find the utensils you need.
- Improve the image your customers have of you.
- Improve your team work and cooperation.
- Improve responsibility and commitment.


There are many resources on the web about this subject, covering all kinds of businesses and situations, big and small, where this methodology can be applied. I’ll be covering each of the steps in a design studio environment and how to implement them and measure the results.

Meet me here next time to cover step 1, Seiri, and learn how to get rid of most of your clutter and not feel guilty about it! :-)

All the best!

Tuesday, August 08, 2006

Designers beware of… technology and supplies.

When running a design office or a design department, you need to assess the kind of equipment you'll be needing and the supplies you'll be using on a daily basis.

If you're starting out, you need to decide the extent of your operation, research the types of activities you'll be performing, so that you can assign a budget for your equipment. Try to figure out how long it'll be before you have to update your hardware and software and take this into consideration when managing your current budget and the budget of the upcoming years.

Also, beware that technology changes too fast in these times. Subscribe to a technology magazine or newsletters and be constantly aware of new developments that can make your work easier of more efficient, or new things that you can offer to your clients. A great one for we designers is Macworld (www.macworld.com). Joining a few technology forums in Ecademy or other platforms is also a great way of being up to date and asking people around for the latest and greatest.

Less expensive items like general office supplies also need to be accounted for. Measure their use and unless you have an unlimited budget for this, try to recycle and get the best of them. You don't always know when you're going to run out of printer cartridges or glossy paper.

All the best!

Designers beware of… production lines.

Once you've completed your design process, it goes to production. Whether it's printing, packaging or product design, you need to be knowledgeable about the production process, in detail.

Suppliers are more than happy to help most of the time, they will explain technical specifications (they will even share molds or keylines) and suggest better ways to handle the design in order to make the most of the process. Knowing about it will give you more authority to assess design issues with clients as well as avoid potential problems during production. If you can, spend a few days in the factory or production line, so that you understand the process thoroughly. Ask many questions.

Take a look into products that have been made using the same production techniques and evaluate how much you can push the boundaries of your design. Learn about the quantity of items to be produced and the budget to do it. These factors may play a key role in how the design should be tackled, for instance, can you produce two different designs at the same time? Is there a limited number of colors available according to the price? What's the minimum/maximum quantity that can be produced in a predefined time?

It's also a very good idea to create mock-ups, specially in product or package design.

Despite all of the above, clarify responsibilities with your client and suppliers. While I'm saying you need to be knowledgeable in the production process, take into consideration that specifications, legal requirements and other production issues should be addressed by them.

All the best!

Designers beware of… customer service.

Something to think about in any business is your relationship with your clients. We designers often think that the world doesn't understand us, that clients don't speak the design language… think again: It is we who need to understand them and speak their language.

Speak their language you ask? It's not as hard as you think, I found that mainly the secret is to listen. Take the time to sit down and find out what your client expects from you and vice versa.

The tracking system I mentioned in my previous blog will be one of your best allies, because you'll always have information for your clients at hand, you'll know exactly where each project is, if it's been invoiced, sent, what the terms where, etc. Accurate information is very valuable to clients and it'll be a differentiating point against your competition.

Also, when the project is in the client's hands, make sure you follow up on them, let them know that you're available to answer any questions and that you care about what they have to say. If you can, attend some negotiation seminars and learn the way to handle tough customers. It is important to learn how to say no as well, and guide your clients towards the best design solution, one that they're happy with and that doesn't compromise your principles.

Remember I told you about speaking the language of the clients? Well, you need also to be aware of the way you speak, this means, grammar, spelling and the way you present ideas. This is particularly important when sending emails and explaining design issues in writing. It is very easy for a customer to get confused when he receives an email and it's not well written.

Revise how much detail you want to go into when discussing matters with your clients. Little detail and you won't be able to convey your message, too much detail and it's likely that your counterpart will get confused. Grammar and spelling do speak about your professionalism, so be aware of the image you're presenting. Check emails for errors or typos before sending them and make sure your staff does the same.

Do call your client on a regular basis to let them know that status of a project. They should never have to call you. Be strict about meeting deadlines and exceed your customer's expectations.

Remember, the clients are the ones bringing in the money, so treat them as you would like to be treated, put yourself in their shoes… you will find that many times your clients become your friends and your best referrals.

All the best!

Designers beware of… time measurement.

Have you even been one of those people that at the end of a long day go "I worked my butt off all day and still I didn't get to do what was important, I feel like I didn't do anything at all…" Well, you may need to start measuring your time.

In my experience I found that there are several kinds of activities, for instance, true added value activities like strategic planning, chore activities like entering invoicing information into a collection system, annoying activities with no added value like burning CDs for other people and personal activities like breaks, lunch or cooler talks, to name a few.

It is important to know how much time you're spending in these activities. Why? Here are a few reasons:

- Because you may be spending a little too much time in activities that add no value to your operation.

- Because you may encounter that you can delegate certain activities to your employees, which not only would empower them, but free time for you to spend in more added value activities.

- Because you may find that it's more effective to hire a consultant to take care of certain time consuming activities or you may even ask for your suppliers to absorb such activities which would make your operation even more effective.

- Because you need to be aware of how long do your typical projects take, in order to have an accurate planning, and how much to charge.

- Because you can plan more strategically ahead of time so that you know if you need to get some outside help for that big project that will be coming next week or if you have some free time to spend on leadership activities with your staff. In other words, when you know how long will your projects take and how they're organized in any given time frame, you get a broader vision of your business.

So here's how I go about it:

- First, get your staff involved, so that the data collection is very accurate.

- Make a list of all the activities you and your staff are performing. Everything from creative meetings to smoking a cigarette, from the time you enter the office to the time you leave. Try not to leave anything out.

- Assign categories to the activities, for instance, a creative meeting and meetings with customers will go under "meetings" or "strategy". It depends on your particular needs and activities.

- Create an Excel table to enter the information with time and date and how long each activity took. For example:

You can set up the Excel table to count the time spent in each category and start analyzing the information, after you've collected it.

- Once you add up the time at the end of a predefined time frame, for instance, a week or a month, you can being to make some choices.

Depending on how many people work for you or your strategic plan, perhaps you want to start with your own activities first and then start measuring the staff according to their tasks, like, first the graphic designers and then, the sales people… it's your call, you define the criteria.

The first time I tried this methodology I found that 40% of my time was spent scanning pictures and burning CDs for other people (We were the only department in the company that had CD burners and a scanner, back in the day). This lead me to suggest to my boss that maybe somebody else (his assistant?) could take care of such activities if he invested a bit of money for the hardware, which would allow me to use that precious time attending to the clients requests.

All the best!

Update: To learn further about how to use the Excel activity tracking tool, go to my article about it, from October 30th, 2007.

Designers beware of… finances.

Money is involved in everything (Well, almost). Design is no exception. When it comes to design, you need to be aware of the costs you have when you're "designing" in order to be able to reduce them, to establish prices, to establish goals and to check if you're operation is actually bringing back some cash.

Along with costs, you need to be aware of your sales and how those are related to the costs you have. In order to "be aware" you need to measure, as my former boss used to say: "What you don't measure, you don't know". In order to measure, you need to establish some data collection, a database or some sort of system that will allow you to keep track of your projects, what went in, what came out. In the beginning I used to do this using File Maker, but a basic Excel table will do. You just need to be disciplined and enter the information rigorously.

So, in short:

- Set up a tracking system, not only to keep track of your design traffic, but to keep track of your costs and sales.

- Measure how much you're spending in the operation (Yes, including the coffee you drink).

- Measure how much you're selling.

- Establish some goals, like reducing costs and increasing sales.

- Follow up and review periodically, about once a week or twice a month.

If you're a flying solo designer, this operation is rather simple, though you may want to get some advice from an accountant or some finance professional.

If you're part of an in-house design department, you need to be aware of your operation and its performance related to the whole company. The finance department is usually happy to help.

If you have your own design studio, consider hiring a financial advisor, but don't leave all up to them, get involved.

All the best!