Showing posts with label management. Show all posts

Friday, April 03, 2009

Relieve stress

Last week I spoke about the two lessons I've learned during last year and 2009. Today I'll speak of the second lesson.

Lesson 2: When things change more often than expected, don't sweat it. Adapt.

Did I say I like planning? I do. But... too much planning can be a waste of time and effort.

Sometimes things just aren't in your hands. You depend on other people, other areas in the company and I think we've pretty much concluded that the only thing you can control is your reaction to situations.

Things change continously and the time lapse between changes is so short that there really is no time to plan again.

What to do?

Stop resisting, go with the flow. Adapt. New circumstances are thrown to you? Re-adjust yourself to respond effectively.

No stress, no worry, no resistance to what is, because it already is!
No complaining, no badbauthing, no resentments.

Regroup, adjust and act.

I wonder what lesson 3 will be...

Friday, March 27, 2009

Micromanaging or are you burning yourself out?

2008 and 2009 so far have taught me two very important lessons. I will cover both in two separate installments.

Lesson 1: Micromanagement

First, let’s define what micromanagement is, according to dictionary.com:

mi⋅cro⋅man⋅age
   /ˈmaɪkroʊˌmænɪdʒ/ Show Spelled Pronunciation [mahy-kroh-man-ij] Show IPA
–verb (used with object), -aged, -ag⋅ing.
to manage or control with excessive attention to minor details.

I like planning. In fact, I love planning. An old boss of mine used to say that the Japanese spend 70% of the time planning. True? I’ve no idea, but I have seen better and more effective results when I plan whatever I’m going to do.

Planning then starts to become addictive and soon you find yourself trying to plan not only your work, but the work of the people you work with.

You want to cover all the bases. You hide your “control-thirst” behind an attitude of “I want to help, I want to teach, to lead”. And in the end you realize there just isn’t enough time to control every variable and more importantly, there isn’t enough time, energy or patience to “control” people.

You are going crazy trying to take care of all the details, people start to hate you because you want them to do things your way, the results are not good and the stress levels rise rapidly.

A crisis is reached.
You reach a crisis.
The smell of smoke coming from your brain.
The realization of the time spent away from family, friends and hobbies.
The thought: Was it worth it?

No, it’s not. It doesn’t matter If you made a lot of money.

My advice?


Chill. Forget about control. Make peace with the fact that it’s not realistic to control everything. In fact, it’s not necessary. Trust in the people you work with (See the podcasts about delegation at www.managertools.com).

Prioritize. How? One really good way is using Pareto’s Law (also known as the 80-20 rule), which states that, for many events, roughly 80% of the effects come from 20% of the causes. So choose the 20% of activities that have the 80% of impact in your operation, and focus on that.

Pareto’s Law is just one way, but research more.

Even if your team don’t deliver, it’s not the end of the world. Re-focus on that 20%. Avoid anger and regroup.

Meet me here next time to review lesson 2!
All the best!

Monday, May 19, 2008

Accountability (Part 1)

From Wikipedia: “Accountability is a concept in ethics with several meanings. It is often used synonymously with such concepts as answerability, enforcement, responsibility, blameworthiness, liability and other terms associated with the expectation of account-giving. As an aspect of governance, it has been central to discussions related to problems in both the public and private (corporation) worlds. […]

In leadership roles, accountability is the acknowledgment and assumption of responsibility for actions,
products, decisions, and policies including the administration, governance and implementation within the scope of the role or employment position and encompassing the obligation to report, explain and be answerable for resulting consequences.”

A few years ago I worked for a Swedish company; one of its core values was “freedom with accountability” which meant that employees were free to act as they saw fit, considering the core values, mission and vision of the company.

So as long as the objectives were met, we were able to come and go from the office, to make our own decisions, to use the company’s resources and to assess situations based on our own principles.

The way most of us responded to this policy was to actually be more responsible, more committed. It taught us that we didn’t need a cop breathing down our necks for us to do better work, to strive for better results, to handle things in on time.

In other words, the company allowed us freedom to choose our courses of action, and in return it got better results from us.

I realize that not everybody will react to such policies in this manner, but rather try to take advantage of the situation to procrastinate and be lazy. Of course in the end, the consequences will be paid.

I am a full supporter of such policies. I believe that being clear about expectations with employees will make it easier to implement these proceedings and, if all goes well, most people will respond the way we did in the Swedish company.

I’m going to touch on three subjects related to accountability: office hours, office site perks and IM in the workplace.


Office hours

There’s usually some office hours policy, right? You’re supposed to go in at certain time in the morning and you’re supposed to leave at some other time in the evening. And you’re supposed to take a fixed amount of time at lunch. This generally applies to everybody except people in sales, or high level managers.

Whenever I’ve been forced to follow the office hours policy, I’ve found myself getting there on time and leaving on time. Not one minute extra. Why? Because it infuriates me that performance and results are measured on a how-long-are-you-at-your-seat basis.

However, whenever I’ve been free to handle my working hours I’ve found myself being more committed to the tasks, mainly because I feel more empowered to manage my time as I see fit, given of course, that I am clear about expectations.

But what exactly are we talking about here?

• Yes, there are office hours, but if you have a personal issue, you can go solve it before coming to the office (Provided this doesn’t cause any trauma on the operation) or leave early to do so.

• Projects and results are evaluated based on completion and quality, instead of how many hours you put into them.

• Weekends are sacred and only you can choose whether or not you go in the office on a weekend to finish something.

• The same goes for after work hours.

• It is expected for the employee to try to balance his working hours with his personal time, as it is vital that employees are rested and energetic to achieve top results in projects.

• It is understood that some personal issues are more important than work.

• People are entitled to take as many breaks as they feel necessary during the day.


Whenever I’ve used these concepts in my experience, employees have never disappointed me.
I leave it out to the community to share some comments about this and about their experiences.

Come back next time, to read Part 2, about office site perks.

Tuesday, May 06, 2008

To design or not to design?

That is the question, indeed. As I’ve said in my profile, I graduated as an industrial designer. However, in my career I’ve never worked with product design. What have I been doing all these years, then? Read on to find out.

When I graduated I landed a job as “designer” for a big multinational company. The job entitled working with digital files of packaging and doing prepress processes. I wasn’t too crazy about it, but I enjoyed the work.

A few months later, I was promoted to head of the department, with one person reporting to me. So now I was in charge not only of the technical aspect of the work, but also of the administrative aspect of the work. Budgets, deadlines, processes, procedures, policies, internal communications, suppliers, staff development, you name it.

And I loved it.

Was it stressful? Hell, yeah! But I really enjoyed that part of the business.

After that job I went on to work in several other companies, doing business or design process related things, but never actually designing. And there came a point when I just admitted that I enjoyed the business aspect of design, more than designing itself. Not only that, I didn’t miss industrial design per se, at all. It could be graphic design or branding.

Where am I going with this, you ask? Bear with me a bit more…

A couple of weeks ago Oprah Winfrey did a show on women who hated their jobs. The special guest was Marcus Buckingham, a career expert from England. Marcus designed a workshop to help people determine a plan to make the best of their professional lives, be it figuring out how to make your job match your strengths, or having the guts to quit it once and for all.

The workshop focuses on figuring out what your strengths and weaknesses are, but seeing these two concepts under a different light, which I thought was very interesting.

Strengths are defined as activities that you do, that invigorate you. How do you know? Because when you’re doing them you get really focused, it’s easy for you to concentrate and you look forward to doing them.

Weaknesses are defined as activities that you do, that drain you. How do you know? Because when you do them, it’s hard to concentrate, you’re always coming up with excuses not to do them, you dread going to work to do them and you feel like they take away your energy.

Pretty easy, huh?


Well, I took the workshop and came to realizations that I was reluctant to admit, but that will help me in the decisions I’m going to make about where I want to go with my career. Maybe I will tell you about those conclusions in another article sometime.

But my point is that just because you graduated from college with a certain degree, doesn’t mean that that’s who you are or what you’re supposed to do for a living. And as Wayne Dyer would say: “Who would trust a seventeen year old with career choices?”.

Maybe I don’t want to be a designer… maybe I want to move to other design related areas like management or teaching… Or maybe I want to try a different design discipline like graphic or interior design, who knows? The future is not written!

And only you can figure out what it is that strengthen or weaken you. I suggest you take the workshop . It’s free!

All the best!

Monday, March 03, 2008

Business Skills Every Creative Needs to Know, Now!

Last week’s HOW’s Newsletter was packed with business related articles for all designers! These articles contain basic information about the design business in general. True, some of them apply only in the US, but they’re worth a read nevertheless.

Among the different titles you can find:

Designers' Hourly Rates See what other designers in the country are charging for their work and how they determine those rates.
Make The Most of Downtime At Work When work gets slow, here are 6 ways to use that extra time to your advantage.
Are You Ready To Freelance Full-Time? Look at our checklist to find out!
Be Your Client's Best Friend 8 ways to keep clients happy.
How to Motivate Every Type of Creative Get specific ideas for encouraging—and getting the best from—any designer.

There are about 90 articles to choose from, so browse around!

Monday, February 18, 2008

Is disorganization and lack of planning effective?

I used to be pretty disorganized when working or doing a project. Then I discovered the many benefits of being organized. And then… there comes a project that made me question if being organized all the time really paid off.

The latest project I embarked in consisted of many items, all showing up at once, handling a massive amount of incoming information and then analyzing, organizing, deciding. This naturally led me to get ready to plan and implement databases and tools to keep track of everything.

But just when I was ready to do that, the person for whom I was doing the project implied that maybe my thoroughness wasn’t really necessary in this case, but rather intrusive and time consuming.

I was resistant, at first, after all, I know how to handle my own information, thank you very much! But then I decided to listen.

So I started questioning my own usual procedures:

- Is a database really necessary?
- How complete should it be?
- What fields should it have?
- Do I need to leave a record of every single item?
- What if I only left a record of the items that were going to go on?
- How can I make this effort more effective?
- What activities don’t have any added value?
- How can I do things more quickly, without sacrificing quality?
- Do I have to follow a predefined set of activities?

So instead of using a huge database with tons of information that I wasn’t immediately going to use, and that I could refer to later, I decided to do things simple.

A mixture of digital (database) and analog (notes and printed materials) mediums to keep track and be effective.

So I realized that I don’t always have to be ultra organized, that some projects don’t need to leave records of everything behind and that they can be done in less time, using less resources, if you’re just open to new ways of doing things and listening to what the customer actually wants and needs.

The moral of the story is, question your own procedures from time to time, you may find new and interesting ways of tackling your projects.

All the best!

Tuesday, October 30, 2007

Time Tracking Tool

Like most designers, I hated Excel. Then one day the best boss I ever had (an engineer, by the way) introduced me to the wonderful world of spreadsheets.

Excel is a very powerful tool once you get to know it. I don’t know that much, actually, but I have developed a few tools to keep track of design traffic and time. Last year I wrote about time measurement and mentioned briefly how to go about tracking time and tasks.

Today I want to go deeper and share with you a tool I created to track the time and activities you do on a daily basis.

It’s pretty simple. With it you can:

· Establish categories for your activities.
· Know how much time you’re spending in such activities, and filter by category.
· Find out if you’re wasting time in meaningless tasks.
· Find out if there are tasks you can delegate, empowering your employees.
· Measure how much time you’re spending at the office.

Also, as I said in the article I mentioned earlier:

You may find that it's more effective to hire a consultant to take care of certain time consuming activities or you may even ask for your suppliers to absorb such activities which would make your operation even more effective.

You need to be aware of how long do your typical projects take, in order to have accurate planning, and how much to charge.

You can plan more strategically ahead of time so that you know if you need to get some outside help for that big project that will be coming next week or if you have some free time to spend on leadership activities with your staff. In other words, when you know how long will your projects take and how they're organized in any given time frame, you get a broader vision of your business.


So without further ado, here’s the tool and the instructions:

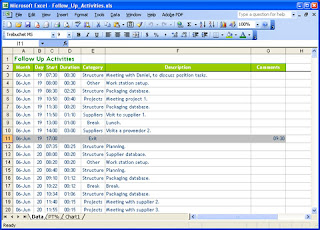
I call it my "Follow Up Activities" spreadsheet. You can download the Excel file here. This is the file as I use it, and this file has been filled for activities for five days, as an example, but feel free to adapt it to your needs!
It’s basically a table with the following fields: Month, Day, Start, Duration, Category, Description and Comments.


Month: This is a text field. I like to name it "00-mmm" where “00” is the number of the month (for instance June would be 06) and “mmm” is the first three letters of the month’s name. Why? Because it allows me to sort by number of the month, instead of the name, so that January will always be at the top, for example.

Day: This is a number field. Type number of the current day.

Start: This is a date/hour field. Type the hour of the day in which that particular activity started, in 24 hour format.

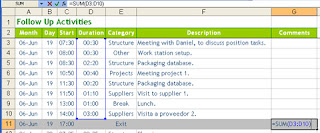
Duration: It’s a date/hour field, with a formula where the duration of the activity is calculated by the starting time of the following task minus the starting time of the previous task. In the picture above the formula would be =C4-C3 for the first cell and then that is copied down on the cells of the D column.

Category: This is a text field. You define the categories of activities. In this example I’ve created seven categories. There’s one called “Breaks” where I record the times I spend on breaks and lunches.

Description: This is a text field. Type a description of the task. I use the same name for the same activity for example I always write “Packaging database” for that particular activity instead of using several different names for it.

Comments: This is a text field. If you wish to add something else like who you met with or if the project was billed, etc.


Now for some instructions:

· Data should be input by the minute, every time you change activity, you need to go there and input that information. This is key, and it needs to be done rigorously and with discipline. This way you always have current information and you're not stuck with having to type several days worth of information.

· The last activity of the day is called “Exit”. You only type the start time, but you must erase the formula in the “Duration” field for this activity.

· When the day ends, I like to use the “Comments” cell of the activity to add up the total hours I spent at the office that day. This is just a SUM formula that adds up the duration of all the activities. For instance in this particular day I was at the office nine and a half hours.


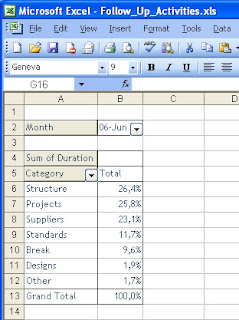
· There’s another worksheet in the Excel file, called "PT%", where I’ve added a Pivot Table report that will tell me how much time I’ve spent in each category or task. Pivot Tables are dynamic, and I can change the fields at leisure. For instance, instead of percentage, I can change it to hours.


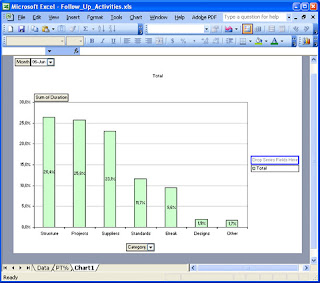
· And I’ve also added a graph to illustrate those times.


Neat, huh? Well, I think so. Do leave some comments if you have some ideas about how to improve this tool!

All the best!

Monday, October 01, 2007

Design resources: Springwise.com and Trendwatching.com

This week I’m going to present young designers with two more resources they can use to expand their creativity and be on top of the latest news.


Springwise.com


“Springwise and its network of 8,000 spotters scan the globe for smart new business ideas, delivering instant inspiration to entrepreneurial minds from San Francisco to Singapore. Time to start the Next Big Thing!

Springwise scans the globe for the most promising business ventures, ideas and concepts ready for regional or international adaptation, expansion, partnering, investments or cooperation. Ferociously tracking more than 400 global offline and online business resources, as well as taking to the streets of world cities, digital cameras at hand.”
Need I say more? In Springwise you’ll find the latest, most wackiest and smartest business ideas from around the globe. It will:

· Be a source if design inspiration.
· Be a source of news and design trends.
· Be a source of practical ideas even you can implement.

Check it out and subscribe to the free newsletter! The latest issue covered:

Product placement agency targets YouTube
Marketing & advertising

Crowdfunding software projects
Media & publishing

Zero cents per minute Update
Telecom & mobile / Marketing & advertising

A social marketplace for clothes hounds
Fashion & beauty

Solar-powered vending machines
Eco & sustainability / Food & beverage

Helping seniors relocate
Life hacks

Free love at the food court
Marketing & advertising

Freeze-dried eco burials
Lifestyle


You can search their webpage by date or by industry, or you can even submit an idea!
Why not give it a try?


Trendwatching.com


“Trendwatching.com is an independent and opinionated trend firm, scanning the globe for the most promising consumer trends, insights and related hands-on business ideas. For the latest and greatest, we rely on our network of 8,000+ spotters in more than 70 countries worldwide.

Most of our findings are aggregated in a free, monthly Trend Briefing, which is sent to 130,000+ business professionals in more than 120 countries. (…) Our trend findings help marketers, CEOs, researchers, and anyone else interested in the future of business and consumerism, to dream up new goods, services and experiences for (or even better, with) their customers.”


In other words, they spot market trends, given them a name and then they follow up on them and show different examples. Some of the trends are:

5*STAR*LIVING
(AFTER) SPOILING DATE
BEING SPACES
BRAND SPACES
BRANDED BRANDS
COUNTER-GOOGLING
COUNTERVALS
CRIBTIMONIALS
CROWD CLOUT
CURATED CONSUMPTION
CUSTOMER-MADE

Visit their trend page, to see more!

This is where the world is headed, so designers, beware!

All the best!

Monday, September 17, 2007

Design Resources: Design Management Institute, DMI.

Hello, there, Everybody! It’s been a long while! Do forgive me, life has been hectic. Anyway…

Here’s another wonderful resource I think designers from all over the world should know about, the Design Management Institute in Boston, US.

I learned about DMI several years ago when I was on a quest to find more information about design management. As they put it:


“The Design Management Institute (DMI) is an international nonprofit organization that seeks to heighten awareness of design as an essential part of business strategy. Founded in 1975, DMI has become the leading resource and international authority on design management. DMI has earned a reputation
worldwide as a multifaceted resource, providing invaluable know-how, tools and raining through its
conferences, seminars, membership program, and publications."

The thing I like the most about DMI is that they are an unlimited source of information and education for any designer, even for us, who don’t live in the US, with the online tools (like Webinars) they’ve got.

There are also many conferences and seminars people in the US can attend. The agenda for October includes:

Design Research for Product and Service Innovation in Chicago.
Law Meets Design in New York.
From What’s Possible to What’s Right online.

Check out DMI’s calendar.


Most of the conferences and seminars are not free, but fairly priced and the topics are really interesting, because they cover design management issues that they don’t teach you at school (Or at least not my school).

Do click around their website to see all the different resources (They even have a job bank) and/or subscribe to their newsletter to get the latest news!

All the best!

Sunday, June 17, 2007

Positive feedback

As most people, I was never very good at recognizing people’s efforts or saying a kind word whenever they showed some progress. In time I realized I had to leave my comfort zone in order to obtain better results.

I think that most people have trouble giving positive feedback. I know I do. However when you’re leading a team of people, be it a design team, your family or people working with you in any other endeavor, you really need to learn to acknowledge even the smallest efforts for improvement.

Why?

Well, who doesn’t want to be acknowledged and not taken for granted? Don’t you want to be? Don’t you get a little spring in your step when someone says something positive about you?

Would you agree with me if I said that positive feedback can largely increase your team’s productivity?

Well, that’s old news, yet I see too many professionals and managers who avoid it.


But what is positive feedback?

It is the action of telling somebody effectively that what they’re doing is acknowledged and recognized.

That’s pretty simple, isn’t it?

Not quite. You see, saying “good job” to someone doesn’t bear the same connotation to actually stating what it was they did well and its impact.


So how to go about it?

There are many resources on the Web about this subject and several ways to use it. Here’s my take on it:

When you spot something that someone has done, when you catch yourself thinking “hey, that’s pretty good”, every single time, even if it’s something small, follow the next steps:


Step 1: State the time.
The specific time in which the person did something well. The phrase should start with their name, followed by an expression of time.

E.g. “Hey, John, this morning…”
John, yesterday during the meeting with customer x…”.
Be as precise as possible.


Step 2: State the action.
The actual thing they did. The fact.

E.g. “Hey, John, this morning when you delivered the sketches on time…”
John, yesterday during the meeting with customer x you supported the concept we were presenting with the items you brought…”.


Step 3: State the impact.
On the operation, how what they did affects the results positively and how it makes you feel.

E.g. “Hey, John, this morning when you delivered the sketches on time, it proved to me that I can trust you with deadlines, that you’re a professional and that you care about what you do”.

John, yesterday during the meeting with customer x you supported the concept we were presenting with the items you brought, which allowed the customer to visualize the project more effectively and made me feel very proud that you’re on our team”.


See, if you’re this specific when giving feedback it has a bigger impact on the person and encourages them to keep striving to be better.

I still struggle a bit with it, it doesn’t come as natural as I’d like, but I’ve found that giving positive feedback builds up relationships and contributes to a more effective and productive work environment.

Care to try this at home, as well?

All the best!

Sunday, June 03, 2007

Design leadership and the constant challenges

Early in my career I was faced with the challenge of being in charge of a section of the company I worked for which included having a person reporting to me. I remember feeling completely scared of becoming a bad boss!

At that time I consulted with a colleague of mine who’d had a lot more experience and he gave me a few pointers. In the end, his best advice was “just be yourself”.

So I became G’s boss.

G happened to be very receptive from the start as we were both learning all the technical aspects of the job.

In the beginning it was hard to get him to see the bigger picture, to plan ahead, he couldn’t imagine how he could predict the events and therefore, the actions to be taken for the upcoming weeks.

But during the five plus years that G and I worked together we both grew professionally to a point where we achieved autonomy in ourselves but presented results as a team.

This was an amazing growing experience and led me to want to continue to grow as a leader.

I recently was faced again with another “being the boss” challenge. Two girls reported to me. One fresh-out-of-college designer and another one with a bit more experience.

This posed a bigger test because I had to use different languages to speak to each of them.

Since my experience with G had been so good and we’d grown together at the same pace, I thought I could just use the same method with anybody.

Not!

Miss F, the fresh-out-of-college designer needed me to hold her hand a bit more, to walk her through the steps of the different activities, to guide her. And she would usually come back to me with “What do I do now, Carolina?”

And I found myself resisting the urge to give her a straight answer. I had to get her to think, to come up with solutions by herself, to be more independent every day, to ask me less.

In the eight months that we worked together she came a long way and could do most of her work all by herself. I was very proud of myself and her.

The other girl, Miss Q, she had a bit more experience and wasn’t afraid to speak her mind. Also, she was strong-willed and assertive. This demanded a different approach from me, one where the ideas would mostly come from her, with a little guidance from me.

This also resulted in a great growing experience; the more I demanded from her, the more she would give and the more she came up with new ideas and solutions.

I have a point, I promise…

Sometimes designers end up becoming creative directors or managing a small group of creative people, which may not be something they ever saw themselves doing.

So here are a few tips to be more effective in that arena:

Be yourself, really. As I’ve said in a previous post, it’s not about barking orders or being in a position of power. It’s about getting the best of people and people will give you their best when you are authentic, honest and real.
Be clear about goals and expectations. Communicate them frequently.

Spend some time trying to figure out what the other person is about, what their mental process is, how they handle information, so that you can figure out the best way to get through to them.

It’s not about them adapting to you or following your lead, but quite the opposite. It’s about you stretching yourself to find the most effective way to get the best out of your team and have some fun while doing it!

I am so looking forward to more leadership challenges in the future, as they are the most interesting part of my work!

Mi idea with this post is that designers think outside of the box and start reflecting on the direction their career can go in the future and if they want to be in a leadership position. If so, start preparing.

Read some books about personal leadership, building teams, managing people and resources… Become aware. There’s a lot of information on the web, podcasts and books.

Epilogue: G went on to take my position and is now the design leader there. Miss F and Miss Q continue to work in my previous company, where they are faced with bigger challenges everyday. The both insist that I was a great boss ;-)

All the best!

Sunday, May 27, 2007

Design magazines

As I’ve discussed before, I think young designers in Latin America would benefit from expanding their scope and trying to find new and wider sources of information. One of those sources are design magazines. Though the web has opened up many doors for designers, there may be some that will read this information for the first time.

Remember how I said that I used to think that my world was really small? Well, when I was at the university I used to think that design magazines were beyond my reach. In those days there was a really beautiful one called Abitare, italian, awesome… we used to see them at the design building’s library.

As years went by, I started working and got a credit card and what do you know…? Using credit cards, you can buy things abroad! I don’t know about you, but this never occurred to me when I was in college (I know, I know… I was either too innocent, or didn’t have good friends!).

So I wanted to let you know about two magazines I’ve been subscribed to for years.

How Magazine: This magazine focuses on graphic design, which being a designer, I love. And it shows some great examples of graphic design, they have contests and then they feature the winners and the contestants, so it’s a great source of visual culture.

Furthermore, what I really love about this magazine is its business edge. You will find design business related articles, from hiring an accountant for your design studio, to how to boost creativity and be a great design leader.

They also do a “Business Annual” every year (no kidding, huh?) that covers even more business related topics like salaries and legal stuff. To me, this magazine is a must read for every designer. It’s American, but I think it conveys the global design business trends of today.

ID Magazine: Sister of How Magazine, ID focuses more on my field, industrial and product design. It doesn’t have the same depth in business issues, but it’s a great showcase of the best of current design. I suggest you get this one too.


So my message for this short post is…

1. Get a credit card! I don’t care if you’re a student, banks always have special promotions for you.
2. Research and subscribe to design magazines. If there aren’t any good ones in your region, subscribe to a couple abroad!
3. Even if you can’t afford it, research local publications. It also doesn’t have to be on your design discipline, you can check some decoration magazines, or architecture… it’ll all become what I call “visual culture”, feeding and stimulating your brain with more design!

I mean, that’s why we became designers, isn’t it?
Hey, do leave a comment if you want to suggest more magazines!
All the best!

Sunday, May 20, 2007

Designers beware: Podcasts

Last year I went to New York and bought an iPod, 60GB, black. Even though I was a bit disappointed in the beginning, I caved in to it, I love it and now I can’t live without it.
Anyway, this post is not about iPods. It’s about me missing out on a wonderful source of knowledge and inspiration for years!


As you probably know by now, I am a huge Harry Potter fan and after J.K. Rowling appointed Mugglenet as the best HP site, I was addicted to it. Some time in 2005 Mugglenet started podcasting with Mugglecast, and I discovered the wonderful world of podcasts, radio-like shows you can download to your iPod!

For those of you who, like me, have (had) been living under a rock for the last few years, keep reading! But of course, most of you will find this information redundant, I bet.

I use iTunes as my podcast aggregator, though there are several others out there. I don’t want to get too technical here, especially because I don’t fully understand how they work. What I can tell you is that using iTunes and clicking on iTunes Store>Podcasts, you can find podcasts about almost every subject imaginable, including, yes, you guessed it, design.


If you go to Categories at the left, and click on Arts and then go down a bit to More Arts, the first category is Design! And now it is your turn to explore. There are podcasts about many aspects of design, the different design disciplines…


Here are a few comments about some I’ve listened to:

The Accidental Creative
Host Todd Henry talks about being creative in an “on-demand” environment. Great ways to boost your creativity!


The Creative Venture
Host Tony Clark brings together the worlds of design and business. Though Tony stopped podcasting a few months ago, you can still download the 14 episodes which are full of great insight into the design business.


Other podcasts I listen to are related to business. My favorite one is Manager Tools, where hosts Michael Auzenne and Mark Hortsman discuss about management issues. I’ve found that most of their advice applies to the design business as well.


I also listen to podcasts related to leadership, finance and other topics in general.

So now that I’ve given you a few pointers, it’s time that you go into iTunes and explore for yourself! Or better yet, find other podcast aggregators and try some! Explore different topics and subscribe to those that you decide you want to listen to on a regular basis. You’ll find that some podcasts are not worth subscribing to because they’re just not very good (like Design Matters with Debbie Millman) or that they just don’t relate to you.

The best part of all this knowledge being shared through podcasts is that it’s free, you can carry it around with you in your iPod or mp3 player, you can save it for later use… did I mention it’s free?!

If some of you can add to this article, let us know more information about podcasts aggregators or other interesting podcasts you listen to, please comment! I’d love to receive your feedback!

All the best!

Saturday, May 05, 2007

Designers beware: 5S Phase 5, Shitsuke (Improve)

Welcome back to my series on 5S, the methodology to improve organization, order and cleanliness. In this article I cover the fifth phase, Improve. If you’ve made it this far, allow me to congratulate you!

But first, if you’re seeing this article and haven’t read the previous four:
Introduction to the methodology
Phase one, Select
Phase two, Organize
Phase three, Clean
Phase four, Standardize


Phase five, Improve

The purpose of this phase is to maintain the achieved conditions and establish new goals for improvement. When you improve you:

- Keep the order that you achieved during Seiton.
- Items return to their assigned place.
- Hardware and workstations are cleaned regularly.
- People enjoy a great work environment and are proud of their places of work.


And the steps:

Step 1: Redefine
You’d establish a standard, right? Now go back to the questions you asked yourself during phases 1 and 2 and ask them again against your current standard. Is there anything that can be done better? Something that doesn’t need to be in the work space?


Step 2: Document
Once you’ve gone through the questions again, see if the standard changed. If so, document again, take a new picture and post it in a visible place.

Here is a picture of the final standard for my desk, though I later on replaced the CD burner for an internal drive. Where are the pens you ask? Neatly stowed away in the drawers.


As a bonus, here I’m showing you a picture of my current desk, still applying the 5S philosophy.


This is my pencil box. It includes only what’s needed. Black, blue and red pens, a pencil, a highlighter and a calendar (Though now that I think about it, does the calendar need to be there? I have one in my computer dashboard… hmm…)


Step 3: Audit
Ok, so by now everybody in the organization has their standards. It’s time to audit their implementation. How to measure and evaluate progress is really up to the team and the criteria they want to apply.

Here’s an example I’ve used to audit offices. We did it weekly, for about a month.

Criteria to evaluate in each step:

Select
I haven’t selected anything (Earns 1 point).
I’ve selected some things (Earns 2 points).
I have only what I need (Earns 3 points).

Organize
I haven’t organized anything (Earns 1 point).
I’ve organized some things (Earns 2 points).
Every item has and is in its place (Earns 3 points).

Clean
I haven’t cleaned anything (Earns 1 point).
I’ve cleaned some things (Earns 2 points).
My work place is clean (Earns 3 points).

Standardize
I haven’t standardized anything (Earns 1 point).
I’ve established the standard (Earns 2 points).

Improve
I’ve improved the standard once (Earns 1 point).
I’ve improved the standard twice (Earns 2 points).
I’ve improved the standard three times or more (Earns 3 points).


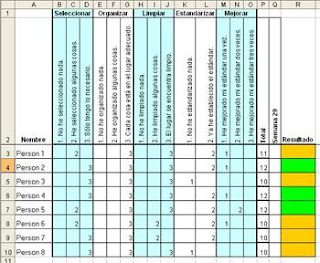
Here’s an example of an Excel table to record and count the points:


After counting the points the person gets a card:

Red card, if the person earned between 5 and 10 points. There’s big room for improvement here.

Yellow card, if the person earned between 10 and 12 points. There’s still room for improvement.

Green card, if the person earned between 12 and 14 points. The work space is very neat and clean!

The idea is for the cards to be displayed in the work area so that maybe a little competition between the people in the team sparks up to get to green in the four weeks of the audit process.

And that’s it for this phase and for the 5S!

It’s a good idea to repeat the audit process in a few months, to see if the team keeps the new conditions.

I hope you’ve enjoyed this series and that your workplaces are areas of productiveness and pride!
All the best!

Sunday, April 29, 2007

Designers beware: 5S Phase 4, Seiketsu (Standardize)

Welcome back to my series on 5S, the methodology to improve organization, order and cleanliness. In this article I cover the fourth phase, Standardize.

But first, if you’re seeing this article and haven’t read the previous four:
Introduction to the methodology
Phase one, Select
Phase two, Organize
Phase three, Clean


Phase four, Standardize

The purpose of this phase is to establish a clear standard for order and cleanliness, in order to maintain the results we achieved with the first three phases. It’s based on easily identifying an abnormal situation from a normal one. When you standardize you avoid:

- Going back to the previous conditions.
- Having work tools laying around.
- Having a disorganized work place that you have to organize again.
- Having people who after implementing Seiri and Seiso still accumulate office supplies on their desk.

And you ensure that:

- Items that don’t belong in the area are easily identified.
- The area is always organized.
- The time to find things is reduced.


Now for the steps:

Step 1: Define
There are several kinds of standards like:
- Oder standards.
- Cleanliness standards.
- Item location visual standards.
- Item quantity visual standards.
- Work place visual standards.

The word “standard” means how that particular item or area is when it’s in an ideal state. In other words, the standard illustrates the ideal state. This step is about defining how it’s supposed to be after you’ve organized and cleaned the space.


Step 2: Document
Remember I told you about documenting everything with your digital camera? Well, that’s because this would be the easiest way to show how your work space should look in an ideal state. You could also draw diagrams of where items need to be placed.

Here’s a picture of how my desk ended up once I implemented the first three phases. It was a lot better (Though not quite as good as it could be, but we’ll get to that in phase 5), so this became the first standard I implemented.


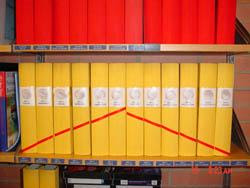
In this next example, see how it’s very easy to recognize when a folder is missing or in the wrong order?


Step 3: Train/divulge
Once you’ve set and documented the standard, you need to make sure that whoever needs to know about it, knows about it! If it’s related to your desk, then maybe you’re the only one you need to know about it. If the standard is of the supplies room, then make sure each person that uses it, knows it, understands it, and follows it. If it’s a picture, post it in a visible spot. If it’s an item quantity standard, post it near the items it relates to.

Now you can compare your current state with the standard and see if they match.

And that’s it for this phase!

But we’re not quite over yet! Meet me here next time to discuss Phase 5, Shitsuke (Improve).
All the best!

Saturday, April 21, 2007

Designers beware: 5S Phase 3, Seiso (Clean)

Welcome back to my series on 5S, the methodology to improve organization, order and cleanliness. In this article I cover the third phase, Clean.

But first, if you’re seeing this article and haven’t read the previous three:
Introduction to the methodology
Phase one, Select
Phase two, Organize

Last week I covered Seiton, where we organized and decided the place for everything. The next phase, Seiso, is about cleaning. Though the methodology lists Seiso as the third phase, it’s possible to clean before you decide where things go.


Phase three, Clean

The purpose of this phase is to eliminate the sources of dirt and to find potentially dangerous areas (i.e. too many plugs in an outlet). When you clean:

- The workplace is a great place to work.
- Things are ready to be used, when needed.
- Cleaning becomes a daily habit.
- Potential safety risks can be addressed.


Now for the exercise:

Step 1: Get ready
Get your supplies like rags and cleaning products and have them ready beforehand.

Step 2: Clean
Pretty straightforward, right? Make sure to be thorough and don’t forget those out of reach places that nobody wants to clean.

Step 3: Place
Place every item in the work area in their decided location.

Step 4: Audit
Once everybody has cleaned their work area, allow for some time, maybe half an hour, in which each person questions how clean every work place is and uses the red labels again, if it’s the case, meaning, if something shouldn’t be in that spot or could be relocated.

And that’s it for this phase!

In industrial environments it has a bigger impact because operators learn more about their machines and see potential industrial risks, like leaks and parts that aren’t working properly, but that’s material for other posts.

By now you’re already seeing the benefits of applying the 5S and if you’ve really embraced it, you’ll notice that you’ve started questioning how other people keep their desks or their houses, haven’t you?

As I said in the first 5S post, you’ll never be the same!

So meet me here next time to cover Phase 4, Seiketsu (Standardize).
All the best!

Sunday, April 15, 2007

Designers beware: 5S Phase 2, Seiton (Organize)

Welcome back to my series on 5S, the methodology to improve organization, order and cleanliness. In this article I cover the second phase, Organize.

But first, if you want to go back to the two previous articles:
Introduction to the methodology
Phase one, Select

Let’s pick up where we left off. Last week I talked about Seiri, to select. At the end of the exercise we had two piles of stuff:

Pile C: The stuff that needs to be in the work space.
Pile D: The stuff that is needed, but not in the immediate work area.


Phase two, Organize

The purpose of this phase is to assign the correct place for each item.

- This will eliminate unnecessary movement because the needed elements are nearby.
- You’ll find elements quicker.
- Error is reduced.
- There are visible clues of where the elements are placed and their quantity.
- The basis for standardization is laid out.


Now for the exercise:

Step 1: Classify
Think about how often you use each item according to the following criteria:

- Infrequent: Things that are used monthly. These can be placed further from the working area.
- Frequent: Things that are used weekly. These can be placed inside the nearby area.
- Very frequent: Things that are used daily. These should be placed in the working area.


Step 2: Quantify
Determine how much of each item is needed in the place where they will be stored. For instance, you may need one black marker on your desk, not five, so the other four can go to the supplies room. Now how many should there be in the supplies room?


Step 3: Place
Determine the exact place where each item goes according to the task they’re used for. Elements needed for the task performed in the specific work area should be inside it.

Group elements according to:
- Process, if they’re used during a specific task, keep them together.
- Function, things that are used for the same purpose, should be kept together.
- Order, things that are used in a certain order, should be placed in a way that will reflect it.


Step 4: Evaluate
Ask yourself:
- Is it obvious when something is missing from its spot?
- Is it obvious when something is there, that shouldn’t be there?
- Do the objects that can be moved, return to their spot?
- Is it visible when you’re running out of supplies?

This step could even include visual clues like contour lines around the spot where things are stored, tags, or quantity indicators to show the maximum amount and the minimum amount so that a new order can be placed.


* This image from the eBook “Estrategia de las 5S” produced by Advanced Productive Solutions, S.L. www.ceroaverias.com


Step 5: Audit
Once everybody has decided the place where everything goes, allow for some extra time, perhaps half an hour, so that everybody can question each other using red labels again. All items marked with red labels need to be relocated within the next few days.


Some additional thoughts:

It is likely that by now you’ve realized that you don’t actually need some of the things you thought you needed. In that case, you can do any of the following actions:

- Store it somewhere else.
- Move it inside the area.
- Sell it.
- Rent it.
- Return it.
- Trash it.

If it’s not needed for the task, it shouldn’t be there. Ideally the only things that should be on a desk is the computer, the immediate supplies like a pen and paper, and the stuff that you’re currently working on. Extra supplies can go in drawers.
Also, don’t forget to document the process with your digital camera.

I want to point out that in the cases of personal offices and desks, 5S is a process that every person needs to assimilate in their own way. Some people are attached to objects that for others have no significant value and this needs to be respected. Each person should take 5S as far as they feel is comfortable for them. For instance, I don’t need to have pictures of every member of my family on my desk; some people do. So beware that everybody has their own pace and nobody is allowed to decide for somebody else in this methodology.

So that’s all for today. Join me here next time to cover Phase 3, Seiso (Clean).

In the meantime let me leave you with this thought: Do you think this can be applied to, say, email, your computer desktop, the closet, the pantry?

All the best!

Sunday, April 08, 2007

Designers beware: 5S Phase 1, Seiri (Select)

Welcome back to my series on 5S, the methodology to improve organization, order and cleanliness.

As I said in my previous post, this methodology can be applied to many aspects of life, as you will surely see in the upcoming weeks, as I unfold the steps to use it in a design studio environment. I won’t go into a lot of depth, since the implementation does depend on your own objectives and the different places of the organization you want to tackle.

So here’s one way of implementing the methodology, CaroAyerbe style:


Let’s say you have a design studio or you work in an in-house design department. Let’s say you want to apply 5S there. The coverage would probably be the design offices and the common areas like the meeting room, the library and/or the supplies room.


Just to show you that I practice what I preach, this here was my actual desk a few years ago, yup, that's my elbow right there...


Before starting:

- Explain the methodology to your people about get a consensus on whether or not they think it’s a good idea to implement it. They always think it's good. (Come on, who doesn’t want to be more productive, right?).
- Designate a team of facilitators which will be in charge of guiding the process.
- One facilitator per area is a good idea.
- Train the facilitators.


Phase one, Select

Basically in this phase you decide what goes and what stays, that’s the main purpose. Why select? Because…

- Work places are filled with clutter.
- The usable space is used by stuff that offers no advantages.
- Closets and shelves contain things that are never used.
- It’s difficult to find the necessary utensils.
- There’s too much stock of stuff you don’t actually need.


What you will need:

- A digital camera. Humans are visual creatures, so one of the best ways to record and evaluate results is to take pictures. The before and after. Ideally, each facilitator has a camera.
- A huge plastic bag, for trash.
- Little red cards. Prepare these beforehand, it can be a little business-card-size piece of paper, with a little ribbon to attach them to objects.


Step 1: Prepare yourself.
Get a plastic bag and red cards.

Step 2: Gather.
Bring all your stuff to one place, near the area you’re working on. Take everything and put it on a big surface… on top of the desk or on the floor. Now, everything means everything. Absolutely every item needs to be accounted for.
It’s necessary to check behind closets, on top of closets, on the walls, places that are not well lit, behind the desk, inside drawers, everywhere.

Step 3: Separate.
Ok, this is where the fun starts! Once everything is in sight, divide it in two piles:

Pile A: The stuff that goes, trash, if you will. What you don’t need.
Pile B: The stuff that stays. What is actually needed or you can’t live without.

So the first pile, pile A, if it’s trash, why make it a pile? Because it’s good to take a picture, and measure how much of what you originally had, was actually garbage. So don’t discard it until the end, but do discard it; this is what the plastic bag is for. The first time we did this, we gathered 127Kg of trash.

By now you’re left with the stuff that is needed, right? Ok, now you’re going to divide that into two new piles:

Pile C: The stuff that needs to be in the work space.
Pile D: The stuff that is needed, but not in the immediate work area.

Step 4: Audit.
Once everybody has separated their materials, allow for some time (maybe half an hour) so that each person can go through other people’s stuff and question if an item should stay by attaching a red card to them. I like to leave a space in the card so that people can write a message on them, something like “do you really need three mugs for your pens?”.

Once the time is over, the person needs to decide whether or not the item goes. Nobody is allowed to remove the cards, until the fate of the item is determined.


And this is the end of phase 1; you now have selected what’s useful.


If you’re one of the facilitators, you will see that deciding what goes and what stays can be tricky for people, especially because we tend to become attached to some objects, so be prepared to deal with someone who thinks they need 7 blue markers and 8 red ones.

If you’re doing this on your own, be honest with yourself and think about what would happen if the object wasn’t there.


Meet me here next time, to talk about Seiton (Organize) and we’ll see what happens to the selected objects!

Do leave me a comment if you have any questions, I’d love to help! Also if you’re familiar with the methodology and would like to add to this article, do so as well! All your comments are welcome.

All the best!


For more information, visit my previous article which is an introduction to the methodology.

Sunday, April 01, 2007

Designers beware: 5 steps to productivity, the 5S.

How would you like to be more productive and have a better workplace? Would you believe me if I said that you can achieve that easily with little or no investment at all?

Would you be able to work here? Do you actually work in a place like this?


Would you like to live like this? Do you currently?


A few years ago, when I was part of the continuous improvement team of the company I worked for, I was entrusted with the task of implementing a certain methodology that promised to improve our productivity. So of course, I had to be the first to test it.

It changed me. I’ll never go back to the way I was before, immersed in clutter, with a feeling of not having any control over my stuff, my activities, my life! Being tired before even starting to work, just by glancing at my desk.

5S (Five eses, if you will) is a methodology that was developed by Japanese companies, mainly Toyota, to improve organization, order and cleanliness in work stations. It can be as extensive as you wish it to be, with thorough measurements of improvement in machinery performance in factory conditions, but as I’ll present in the upcoming posts, it can be applied to almost every aspect of life, yes, the design business included.


What can 5S do for you? Keep reading…

The name 5S responds to five Japanese words that describe each of the five steps:

1. Seiri (Select)
Identify and separate the necessary from the unnecessary items.

2. Seiton (Organize)
Everything has its place.

3. Seiso (Clean)
Identify and eliminate sources of dirt and clutter.

4. Seiketsu (Standardize)
Maintain the status of order and cleanliness achieved.

5. Shitsuke (Improve)
Make it a habit and reach new standards of order and cleanliness.


5S can be defined as an ideal state in which:

- Unnecessary materials or utensils have been eliminated.
- Everything has been identified and been assigned a place.
- Clutter has been eliminated.
- There are visual references to control the status of processes.
- All this is maintained and continuously improved.


By implementing 5S you will:

- Reduce errors.
- Reduce supplies inventory.
- Reduce unnecessary movement.
- Gain more space.
- Be proud of your work place.
- Easily recognize the status of things.
- Quickly find the utensils you need.
- Improve the image your customers have of you.
- Improve your team work and cooperation.
- Improve responsibility and commitment.


There are many resources on the web about this subject, covering all kinds of businesses and situations, big and small, where this methodology can be applied. I’ll be covering each of the steps in a design studio environment and how to implement them and measure the results.

Meet me here next time to cover step 1, Seiri, and learn how to get rid of most of your clutter and not feel guilty about it! :-)

All the best!

Saturday, March 10, 2007

Designers beware: Setting clear goals and expectations.

Lately I’ve found myself having differences of opinion with people about my ideas on how to lead a design team. I want to present a situation to the community and get some feedback on whether or not I am completely off my rocker.

Let’s say you own a small design studio or you lead an in-house team. Let’s say you hire a new designer. A young bright designer. Let’s say that this new designer is assigned a group of tasks that involve learning a new software or mastering a technology which he hasn’t been exposed to before. He’s expressed this openly to you during the selection process.

The standards or final goals are clear in your head. You know exactly what you expect from the designer.

The question is: How do you get this new designer from not knowing quite how to do the work to getting the job done as you want it?

Some might argue that if this designer is as bright as he seems, he should figure it all out on his own. Now, from my point of view, there are three things/issues he should figure out:

- One, how to work the software/new technology.
- Two, the standards the job needs to meet.
- Three, how much time he’s allowed to take to get to the expected level of performance.

Do you agree with me so far?

New set of questions: What would happen if you (the manager) fail to give information to this young designer on one of the three issues. In fact, what would happen if you refuse to provide information on all of them? What would be the odds of this designer meeting your criteria? Would you still expect him to?

Believe it or not, I’ve encountered such a situation recently.

So here’s what I think:

Issue one, yes, software and new technology usually come with manuals, and yes, there are forums on the web where a person can post his questions and get some guidance. Would this be enough?

Would it be reasonable to ask one of the designers on the team (one that knows how to work the technology) to help the young bright designer? Would it be reasonable for you to spend some time with the designer, explaining the basics of the technology? Would this help him reach the performance level quicker? I would say so, wouldn’t you?


Issue two, could the new designer guess what you expect? Let’s say he’s so brave, he went straight to you and asked about it and you ignored him because you thought explaining that would just take too much time. Would you still expect him to know how the job needs to be presented?

Again, would it be reasonable to enlist the help of another designer on the team or to perhaps spend some of your time explaining the standards that need to be met? Would this help the designer present the job according to the expectations? I would say so, wouldn’t you?


Issue three, would the designer be able to guess how long would be a reasonable time to reach the expected level of performance? Would anybody in this situation be? Would it help to inform him clearly when you expect to see results? Would it help him if you gave him a schedule of steps or small goals he needs to reach and their timeframe? I would say so, wouldn’t you?


So by now I’m guessing you’ve gotten my point. You cannot expect someone who’s new on a job to guess how things need to be done. Especially if this young bright designer is also fresh-out-of-college.

You need to give this person the tools, all the tools available, for him to learn as soon as possible. You need to inform the standards that the job has to meet and you need to be clear on deadlines, schedules and expectations. Period.

Let’s avoid the “quick-fix” mentality and let’s start building a real design team. Let’s spend time training our people so that they can be more productive now and in the long run and so that we can deliver better work.

If our schedule is so tight, let’s delegate! Other designers would be more than willing to guide the new guy! Don’t you agree? Wouldn’t you go as far as calling the attitude of the manager I’ve described as “negligent”?

I’d love to receive some comments and know what other people think. Are there people out there who can “guess” how a job needs to be done? Would they be successful if they put more “effort” into it? Am I missing something here?

All the best!