Showing posts with label tips. Show all posts

Sunday, June 22, 2008

Honor your commitments

Obvious, right? Yet seldom people do. It all boils down to that short, simple word: Trust. And trust can make or break a deal, can’t it? But if it’s so important, why then people don’t honor their commitments?


When I was a teenager I suffered of disorganization and lack of direction and focus. Then I started working and soon I learned that professional life is filled with commitments. From the specific goals for your position to the staff meetings, you acquire commitments all the time.

And people expect you to do what you said you were going to do, when you said you were going to do it, using the parameters you agreed to use.

So I embraced this “honoring my commitments” philosophy and I’ve been like that ever since.

I’ve recently experienced quite the opposite working inside a corporate culture in which getting 30 minutes late to a meeting or not showing up at all is considered normal. I reluctantly accept a 15 minute tardiness. Any longer than that is simply an insult. Or so I thought.

Now my new challenge is to not let myself be contaminated by such culture, which is somewhat hard to do because if they’re not going to show up, why bother handing in your homework?

So far, I’ve been able to identify two kinds of people:
- Those who say they’re going to do x or y and don’t do it and…
- Those who just can’t say no to anything.

I intend to make this post into a wake up call for the vast number of people who take commitments lightly:

Do you want your customers and employees loyalty?
Earn their trust.
How?
Do things when you say you’re going to do them. To the minute.
Do things the way you say you’re going to do them. Always.
Strive for excellence.

It will render high dividends, even more sales! As the Mastercard campaign goes: “Being trustworthy: Priceless”.

All the best!

Tuesday, January 29, 2008

Designers of the World, Write.

This week, How Magazine presents a very interesting article by Juliet D'Ambrosio, associate creative director at Atlanta-based Iconologic. The article begins like this:

It's a strange paradox: So many designers whose work speaks so fluently in images flee in terror when called upon to communicate with the written word. After all, designers are nothing if not communicators, and communication is most fully realized when image and word unite.

Juliet presents seven steps to tackle this challenge. I suggest you read on, to find out more.

All the best!

Friday, January 18, 2008

Top Ten Job Hunting Blunders in Latin America

Nobody is perfect, especially when it comes to job hunting, which is greatly subjective. There are however, practices that should be avoided if you want to up the chances of getting an interview.

In my experience, I’ve had the opportunity to recruit mostly designers though I’ve recruited other positions. And believe me, when you’ve got about 500 resumes to read, you’re just looking for reasons to filter the best out quickly.

Here I present to you the top ten blunders (In no particular order) I see in designers looking for a job in Latin America. Let me tell you, these poor souls weren’t called for an interview.

Blunder 1: “Maybe someone will see how much I need the job and hire me”.
Nobody will hire you for a design position out of pity. Remember, it’s not what the company can do for you, but the other way around. People hire you for two basic reasons: They want you to help increase sales, or cut back costs. Think about how you can play a part in either or both and present yourself that way to the company. You’ll boost your chances of getting called for an interview.

Blunder 2: “Let me go ahead and send just my resume without a portfolio. After all, who cares about the work I’ve done?”
Helloooooo! Aren’t you a designer? When you send your resume for a position as a designer, and don’t send a portfolio, you’re not leveraging the opportunity to make a great first impression, thus losing the battle against people who walk the extra mile and do send samples of their best work. Who would you call for an interview? Don’t place any more work on the recruiter, making them send you an email requesting a portfolio. Send it up front!

Blunder 3: “She’s not going to notice that I sent it to nine different places at the same time”.
You send the resume in an email to several different job offering people in the “To” field, displaying the fact that you don’t care about any particular company or position and that you didn’t even research those companies. Worst of all, displaying your carelessness when it comes to presenting yourself which could lead one to believe that you’re sloppy in your work as well.

Blunder 4: “I know! I’ll just write ‘resume’ in the subject line of the email! That’ll set me apart from everybody!”
Again, a sea of emails and resumes. Think, how can you set yourself apart? The least you can do is write your name and the position you’re applying to in the subject line of the email. This way you make it easier for the recruiter to find you.

Blunder 5: “Wow, my resume is so gorgeous, I’m not going to even bother to check my spelling”.
Wrong! Send a resume with spelling and grammar errors and you’ll be screaming sloppy. You’re a designer, you need to be concerned with kerning and correct punctuation. Who wants to hire a designer that doesn’t pay attention to details?

Blunder 6: “Picture perfect?”
So you went against your better judgment and decided to include your picture on your resume. I suggest you run a poll among your closest friends and acquaintances to decide whether or not the picture does you justice. With all due respect, but the mug shot, or the I-just-got-out-of-bed, or the I’m-so-pitiful-please-hire-me look don’t favor anyone.

Blunder 7: “I’m sure they’ll only receive about three designer resumes, so why bother with a presentation letter? I’ll just send my bare resume”.
Again, 500 resumes at any given time. The key here is to differentiate yourself. Other designers present their case in the email or the presentation letter, telling the company how hiring them would be a good idea, how they can help the business grow sales and how what they have to offer matches the company and the position. You might want to try that sometime.

Blunder 8: “Maybe they won’t notice that I’ve applied to three different positions in the same company”.
When you apply to different positions, it just conveys the message that you don’t know what you want or how your skills can match the diverse jobs. Take the time to research the positions and the company, before applying.

Blunder 9: “So I have to format my portfolio to fit their expectations? If they can’t open it, it’s not my problem”.
The recruiter has requested something from you, and you find it annoying to have to comply. Either they can’t read a .exe or they’d like you to send JPGs instead of PDFs. Hmm, you might as well say that you’re not interested, or better yet, don’t send your resume at all! Why? Because there are other designers who are willing to do whatever it takes to land an interview and you’re… not.

Blunder 10: “I’m sure it’s like all the other design studios. Why bother looking for more information? I know them all”.
You’ve been lucky enough to land the interview, yet you get there and you don’t even remember the position you applied to! You also didn’t research the company and its culture, so you are completely clueless. This screams with conceitedness and lack of vision about how you can help the company first.


For every designer that is not willing to walk the extra mile, there’s another one who will, and who has a far greater chance of landing the job.

All the best!


Related articles:
12 resume writing tips for designers.
Designers beware: Your portfolio.
Designers beware: Being the interviewee (Part 1).
Designers beware: Being the interviewee (Part 2).
Designers beware: Being the interviewer.

Monday, December 17, 2007

Getting a client, instead of an occasional buyer

cli·ent
–noun 1. a person or group that uses the professional advice or services of a lawyer, accountant, advertising agency, architect, etc.

But, I think we all know a client is much more than that, don’t we?


Clients pay for the service you provide for them. Give good service, and you will:
- Have a loyal client that keeps coming back for more, providing you in return, with steady income.
- Have a client that will give his friends good references of you, providing you with more work.
- Get an ally and a friend that will help your business grow, while you make theirs, grow.

Sounds great, right?

And how exactly do you get to that point?

Allow me to illustrate with a recent experience of mine:

A couple of weeks ago I wanted to buy a watch, so I went to the mall. There were about five stores that carried the kind of watch I wanted. So I went to the first store and requested the watch, and they had it, except they carried it in light blue and pink.

“Hmm, I’d rather it was black” I said to the sales guy. “We don’t carry it in black” he said. So I replied “Great, let me check other stores and see if I can find it. If I don’t, I’ll come back and buy one of these”, to which he replied “You’re not going to find it in this mall. We’re the only ones who carry this particular model, so you might as well buy it right away”.

“Thanks” I said, “I’ll take my chances”.

The second store I visited carried the watch and guess what: They had it in black! The sales lady was very polite, told me the price, allowed me to try it on… But I still wanted to see if I could get a better price somewhere else. “Thanks” I said, “I’ll check other stores and come back if I decide to buy this one”. “Great!” she said, “I’ll be here if you need me”.

Surely enough, I went to other stores, they all carried the watch in different colors, including black. Where do you think I went back to buy the watch?

See the difference? The first guy was interested in making THIS particular sale and getting his commission. The second lady was interested in what I wanted. I wanted a black watch, at a better price.
Sure, she wanted to sell hers too, but she was more focused on providing a service and letting the customer get the best deal (And of course, she was confident that I could not get a better price anywhere else). She was also very friendly and provided me with great service by giving me information and allowing me to try it on.

If I ever need to buy another watch, or if I know of someone that needs one, I’ll recommend that particular store. She got herself a client.

If I had bought the watch at the first store just because I couldn’t find it anywhere else, I would’ve become an occasional buyer and would have never come back. And I am not coming back.

Who’s more intelligent? I bet by now you get my point…

Think of providing a service, a great service, instead of thinking about how to make one sale. Think of what the client wants and give it to them. It may be that the client doesn’t actually buy from you now, but they will remember you and come back if they see that you’re eager to provide them with value, rather than just take their money.

All the best!

Tuesday, October 30, 2007

Time Tracking Tool

Like most designers, I hated Excel. Then one day the best boss I ever had (an engineer, by the way) introduced me to the wonderful world of spreadsheets.

Excel is a very powerful tool once you get to know it. I don’t know that much, actually, but I have developed a few tools to keep track of design traffic and time. Last year I wrote about time measurement and mentioned briefly how to go about tracking time and tasks.

Today I want to go deeper and share with you a tool I created to track the time and activities you do on a daily basis.

It’s pretty simple. With it you can:

· Establish categories for your activities.
· Know how much time you’re spending in such activities, and filter by category.
· Find out if you’re wasting time in meaningless tasks.
· Find out if there are tasks you can delegate, empowering your employees.
· Measure how much time you’re spending at the office.

Also, as I said in the article I mentioned earlier:

You may find that it's more effective to hire a consultant to take care of certain time consuming activities or you may even ask for your suppliers to absorb such activities which would make your operation even more effective.

You need to be aware of how long do your typical projects take, in order to have accurate planning, and how much to charge.

You can plan more strategically ahead of time so that you know if you need to get some outside help for that big project that will be coming next week or if you have some free time to spend on leadership activities with your staff. In other words, when you know how long will your projects take and how they're organized in any given time frame, you get a broader vision of your business.


So without further ado, here’s the tool and the instructions:

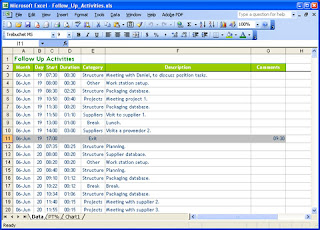
I call it my "Follow Up Activities" spreadsheet. You can download the Excel file here. This is the file as I use it, and this file has been filled for activities for five days, as an example, but feel free to adapt it to your needs!
It’s basically a table with the following fields: Month, Day, Start, Duration, Category, Description and Comments.


Month: This is a text field. I like to name it "00-mmm" where “00” is the number of the month (for instance June would be 06) and “mmm” is the first three letters of the month’s name. Why? Because it allows me to sort by number of the month, instead of the name, so that January will always be at the top, for example.

Day: This is a number field. Type number of the current day.

Start: This is a date/hour field. Type the hour of the day in which that particular activity started, in 24 hour format.

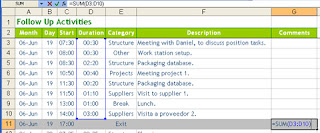
Duration: It’s a date/hour field, with a formula where the duration of the activity is calculated by the starting time of the following task minus the starting time of the previous task. In the picture above the formula would be =C4-C3 for the first cell and then that is copied down on the cells of the D column.

Category: This is a text field. You define the categories of activities. In this example I’ve created seven categories. There’s one called “Breaks” where I record the times I spend on breaks and lunches.

Description: This is a text field. Type a description of the task. I use the same name for the same activity for example I always write “Packaging database” for that particular activity instead of using several different names for it.

Comments: This is a text field. If you wish to add something else like who you met with or if the project was billed, etc.


Now for some instructions:

· Data should be input by the minute, every time you change activity, you need to go there and input that information. This is key, and it needs to be done rigorously and with discipline. This way you always have current information and you're not stuck with having to type several days worth of information.

· The last activity of the day is called “Exit”. You only type the start time, but you must erase the formula in the “Duration” field for this activity.

· When the day ends, I like to use the “Comments” cell of the activity to add up the total hours I spent at the office that day. This is just a SUM formula that adds up the duration of all the activities. For instance in this particular day I was at the office nine and a half hours.


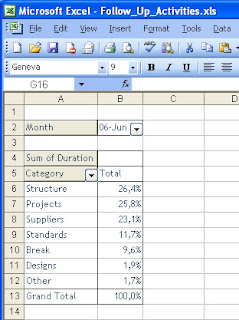
· There’s another worksheet in the Excel file, called "PT%", where I’ve added a Pivot Table report that will tell me how much time I’ve spent in each category or task. Pivot Tables are dynamic, and I can change the fields at leisure. For instance, instead of percentage, I can change it to hours.


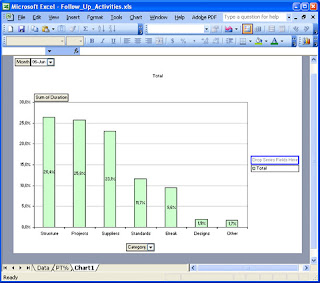
· And I’ve also added a graph to illustrate those times.


Neat, huh? Well, I think so. Do leave some comments if you have some ideas about how to improve this tool!

All the best!

Sunday, June 17, 2007

Positive feedback

As most people, I was never very good at recognizing people’s efforts or saying a kind word whenever they showed some progress. In time I realized I had to leave my comfort zone in order to obtain better results.

I think that most people have trouble giving positive feedback. I know I do. However when you’re leading a team of people, be it a design team, your family or people working with you in any other endeavor, you really need to learn to acknowledge even the smallest efforts for improvement.

Why?

Well, who doesn’t want to be acknowledged and not taken for granted? Don’t you want to be? Don’t you get a little spring in your step when someone says something positive about you?

Would you agree with me if I said that positive feedback can largely increase your team’s productivity?

Well, that’s old news, yet I see too many professionals and managers who avoid it.


But what is positive feedback?

It is the action of telling somebody effectively that what they’re doing is acknowledged and recognized.

That’s pretty simple, isn’t it?

Not quite. You see, saying “good job” to someone doesn’t bear the same connotation to actually stating what it was they did well and its impact.


So how to go about it?

There are many resources on the Web about this subject and several ways to use it. Here’s my take on it:

When you spot something that someone has done, when you catch yourself thinking “hey, that’s pretty good”, every single time, even if it’s something small, follow the next steps:


Step 1: State the time.
The specific time in which the person did something well. The phrase should start with their name, followed by an expression of time.

E.g. “Hey, John, this morning…”
John, yesterday during the meeting with customer x…”.
Be as precise as possible.


Step 2: State the action.
The actual thing they did. The fact.

E.g. “Hey, John, this morning when you delivered the sketches on time…”
John, yesterday during the meeting with customer x you supported the concept we were presenting with the items you brought…”.


Step 3: State the impact.
On the operation, how what they did affects the results positively and how it makes you feel.

E.g. “Hey, John, this morning when you delivered the sketches on time, it proved to me that I can trust you with deadlines, that you’re a professional and that you care about what you do”.

John, yesterday during the meeting with customer x you supported the concept we were presenting with the items you brought, which allowed the customer to visualize the project more effectively and made me feel very proud that you’re on our team”.


See, if you’re this specific when giving feedback it has a bigger impact on the person and encourages them to keep striving to be better.

I still struggle a bit with it, it doesn’t come as natural as I’d like, but I’ve found that giving positive feedback builds up relationships and contributes to a more effective and productive work environment.

Care to try this at home, as well?

All the best!

Sunday, June 03, 2007

12 resume writing tips for designers

Looking for a job? Finding a new design position can be a very daunting and stressful experience, especially if you're a fresh-out-of-college designer applying for your first creative job.

In my recruiting experience I've found that most young designers in South America and Colombia would benefit from some guidance with regards to self-promotion.

So if you're fresh out of college, or a senior designer straight out of a long career, here are twelve top tips for designers' resumes that can help you land that all-important interview:

  1. Do some research
    Even if you think you know everything there is to know about designing a document, use your design know-how to effectively present your resume.

    There are tons of websites with information about designing a CV (Curriculum Vitae) like Rita Sue Siegel Resources, for example.

    Now, being a designer, most likely you're expected to show your creative side in your resume (At least I expect that.)

    Nevertheless, this is a document for you to show that you're a professional and therefore, all the right information must be included, even if it means sacrificing that beautiful symbol you want displayed throughout the whole document.

    So your flair for design is there only to enforce the information in your resume. Always remember: style over substance is a big no-no!


  2. Customize your resume to match the position
    Designers can work in different areas of design. I've seen this especially with graphic designers.

    If the position calls for an illustrator, make your resume reflect that in the jobs or projects you want to show.

    If the position calls for a web designer, then include all web work you've done with links (making sure those websites are still active!) If you think something else will add to your value proposition, include it.

    However, don't try to squeeze all your work experience in just one page if some of it has no relevance to the position.


  3. Make it a one-page resume
    Yes, all necessary information can fit in one page, as weird as it sounds.

    You have to think that the person receiving your resume is receiving a lot more and she probably is printing them out to read at her leisure (i.e.: when she has the time.)

    Make her job easier by including all pertinent information in a single page; you will earn some extra points for that.

    Now, you're a designer, play with typography, space, color… it's also very important to make sure the information is presented in an organized, clear, easy-to-read way and have some fun! Make your personality and style show through.


  4. Proofread your resume
    Don't forget to double – better yet, make that triple – check your document for typos and grammar errors. Nothing says “unprofessional” like a sloppy resume.

    Set time side and get someone else to read your resume through for you. Maybe your mom, your dad, a friend maybe – anyone, so long as your resume is proofread.


  5. Highlight your name and contact information
    Your name and your contact details are the most important part of your resume!

    Make them stand out by placing them where they will be easier to read for the recruiter: most likely the right top corner of the page, or top centered.

    Do include all your contact information, telephone numbers (cell included) where you can be reached for sure.

    If your email is something like “big_stud@hotmail.com” it's better to get a new one, just your name and last name, something that identifies who you are.

    I personally think that it's not necessary to include your photo, though I've seen some pretty cool ways to add a picture of yourself as an illustration or an unusual treatment in Adobe Photoshop.

    If you're applying for a job as an illustrator, this could be a good way to highlight your resume and maybe stand out from the rest.


  6. State your profile
    Include a brief paragraph expressing what your profile as a designer is, or what your major, or preferred areas of expertise are and what short-term goals you have.

    This helps the recruiter see quickly if your profile matches what they're looking for.

    Additionally, try not to talk about the long-term in a way that sounds like you're just using your prospective employer as a stepping-stone in your design career.


  7. Add the professional experience information
    Include your work experience, listing jobs in reverse chronological order. For each job include:

    • The time period (the date when you started and when you finished) for that job, including year and month.

    • The responsibilities of your design position.

    • The achievements of the position, and how they translated into either an increase in sales or the reduction of costs for the firm. Add some numeric information, when possible.


    If you've worked as a web designer, or have links to your work on the Internet, make sure they work properly and contain all updated information.


  8. Add the academic information
    Include the qualifications you have and filter them to be pertinent to the position you're applying to.

    Also list your qualifications in reverse chronological order, too.

    Be sure to include the year in which you graduated and the title you received.


  9. Make sure you send the right file
    When sending your resume file through email, take into consideration:

    • Check that your file is complete. Yes, I've received resumes that only list the jobs, with no name or contact info, because the person forgot to include the previous pages!

    • Here's another chance to stand out by naming your file with your name, e.g.: “carolina_ayerbe_CV.pdf”; make the work of the recruiter simpler and make your design resume easy to find among all the files she's downloaded that are called “CV.doc”, “resume.pdf” and every other file name that doesn't provide any information as to what it contains.

    • Include your name, title and the position you're applying for in the subject line of the email.

      It makes it easier to find you in the long list of emails the recruiter receives every day.

    • Write a short, warm and assertive email message to go with your attachment. This will effectively act as your covering letter.


    Don't just send the attachment alone; some people might take this gesture to be rude. Say hello, at least. Be polite!

    Don't underestimate the value of a well-crafted message selling the benefits the company will get by hiring you.

    If necessary, go back to the Tip 1 and do some research on how to write a proper resume covering letter.


  10. Don't lie
    Most recruiters can see through a liar. Show your work in a dignified way, talk about your accomplishments, but don't try to sell things as more than they really are.

    I once received a CV from a designer who'd presented himself as a “brand creator”. Hmm, interesting, I thought.

    When I interviewed him and asked him how he went about creating a brand, it became obvious the guy had no idea what he was talking about. We both wasted our time.

    Be honest about what you've achieved as a designer. It's much more effective.


  11. Combine your resume with your portfolio
    I really like it when the resume includes some examples of the work the designer has done.

    All contact, work and academic information should be in the first page.

    From the second page on, it's a good idea to include three or four examples of your best work. This will be the entrée for the recruiter to ask for a more complete portfolio from the designer.

    Don't send twelve pages, though. Still keep it short, two or three pages maximum.


  12. Be professional
    Most young designers aspire to rise to the level of a professional. Design is a business; it's not just about the perfect decoration in the pretty resume. I'll say it again: style over substance is a big no-no!

    It has to convey a message of professionalism, that you can actually do the job and that you know how to speak the design language inside a business setting.


I hope these tips help out a few designers out there.

For more resources visit:

I look forward to receiving some comments.

All the best!

This article is a revision on a first version I posted a while ago. Thanks to Wayne Smallman, technology blogger and fellow designer for revising the english version of the original article.

Sunday, May 27, 2007

Design magazines

As I’ve discussed before, I think young designers in Latin America would benefit from expanding their scope and trying to find new and wider sources of information. One of those sources are design magazines. Though the web has opened up many doors for designers, there may be some that will read this information for the first time.

Remember how I said that I used to think that my world was really small? Well, when I was at the university I used to think that design magazines were beyond my reach. In those days there was a really beautiful one called Abitare, italian, awesome… we used to see them at the design building’s library.

As years went by, I started working and got a credit card and what do you know…? Using credit cards, you can buy things abroad! I don’t know about you, but this never occurred to me when I was in college (I know, I know… I was either too innocent, or didn’t have good friends!).

So I wanted to let you know about two magazines I’ve been subscribed to for years.

How Magazine: This magazine focuses on graphic design, which being a designer, I love. And it shows some great examples of graphic design, they have contests and then they feature the winners and the contestants, so it’s a great source of visual culture.

Furthermore, what I really love about this magazine is its business edge. You will find design business related articles, from hiring an accountant for your design studio, to how to boost creativity and be a great design leader.

They also do a “Business Annual” every year (no kidding, huh?) that covers even more business related topics like salaries and legal stuff. To me, this magazine is a must read for every designer. It’s American, but I think it conveys the global design business trends of today.

ID Magazine: Sister of How Magazine, ID focuses more on my field, industrial and product design. It doesn’t have the same depth in business issues, but it’s a great showcase of the best of current design. I suggest you get this one too.


So my message for this short post is…

1. Get a credit card! I don’t care if you’re a student, banks always have special promotions for you.
2. Research and subscribe to design magazines. If there aren’t any good ones in your region, subscribe to a couple abroad!
3. Even if you can’t afford it, research local publications. It also doesn’t have to be on your design discipline, you can check some decoration magazines, or architecture… it’ll all become what I call “visual culture”, feeding and stimulating your brain with more design!

I mean, that’s why we became designers, isn’t it?
Hey, do leave a comment if you want to suggest more magazines!
All the best!

Saturday, May 05, 2007

Designers beware: 5S Phase 5, Shitsuke (Improve)

Welcome back to my series on 5S, the methodology to improve organization, order and cleanliness. In this article I cover the fifth phase, Improve. If you’ve made it this far, allow me to congratulate you!

But first, if you’re seeing this article and haven’t read the previous four:
Introduction to the methodology
Phase one, Select
Phase two, Organize
Phase three, Clean
Phase four, Standardize


Phase five, Improve

The purpose of this phase is to maintain the achieved conditions and establish new goals for improvement. When you improve you:

- Keep the order that you achieved during Seiton.
- Items return to their assigned place.
- Hardware and workstations are cleaned regularly.
- People enjoy a great work environment and are proud of their places of work.


And the steps:

Step 1: Redefine
You’d establish a standard, right? Now go back to the questions you asked yourself during phases 1 and 2 and ask them again against your current standard. Is there anything that can be done better? Something that doesn’t need to be in the work space?


Step 2: Document
Once you’ve gone through the questions again, see if the standard changed. If so, document again, take a new picture and post it in a visible place.

Here is a picture of the final standard for my desk, though I later on replaced the CD burner for an internal drive. Where are the pens you ask? Neatly stowed away in the drawers.


As a bonus, here I’m showing you a picture of my current desk, still applying the 5S philosophy.


This is my pencil box. It includes only what’s needed. Black, blue and red pens, a pencil, a highlighter and a calendar (Though now that I think about it, does the calendar need to be there? I have one in my computer dashboard… hmm…)


Step 3: Audit
Ok, so by now everybody in the organization has their standards. It’s time to audit their implementation. How to measure and evaluate progress is really up to the team and the criteria they want to apply.

Here’s an example I’ve used to audit offices. We did it weekly, for about a month.

Criteria to evaluate in each step:

Select
I haven’t selected anything (Earns 1 point).
I’ve selected some things (Earns 2 points).
I have only what I need (Earns 3 points).

Organize
I haven’t organized anything (Earns 1 point).
I’ve organized some things (Earns 2 points).
Every item has and is in its place (Earns 3 points).

Clean
I haven’t cleaned anything (Earns 1 point).
I’ve cleaned some things (Earns 2 points).
My work place is clean (Earns 3 points).

Standardize
I haven’t standardized anything (Earns 1 point).
I’ve established the standard (Earns 2 points).

Improve
I’ve improved the standard once (Earns 1 point).
I’ve improved the standard twice (Earns 2 points).
I’ve improved the standard three times or more (Earns 3 points).


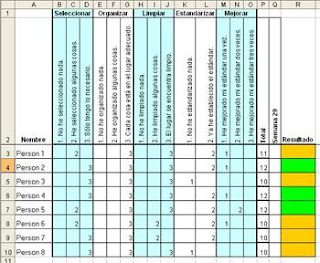
Here’s an example of an Excel table to record and count the points:


After counting the points the person gets a card:

Red card, if the person earned between 5 and 10 points. There’s big room for improvement here.

Yellow card, if the person earned between 10 and 12 points. There’s still room for improvement.

Green card, if the person earned between 12 and 14 points. The work space is very neat and clean!

The idea is for the cards to be displayed in the work area so that maybe a little competition between the people in the team sparks up to get to green in the four weeks of the audit process.

And that’s it for this phase and for the 5S!

It’s a good idea to repeat the audit process in a few months, to see if the team keeps the new conditions.

I hope you’ve enjoyed this series and that your workplaces are areas of productiveness and pride!
All the best!

Sunday, April 29, 2007

Designers beware: 5S Phase 4, Seiketsu (Standardize)

Welcome back to my series on 5S, the methodology to improve organization, order and cleanliness. In this article I cover the fourth phase, Standardize.

But first, if you’re seeing this article and haven’t read the previous four:
Introduction to the methodology
Phase one, Select
Phase two, Organize
Phase three, Clean


Phase four, Standardize

The purpose of this phase is to establish a clear standard for order and cleanliness, in order to maintain the results we achieved with the first three phases. It’s based on easily identifying an abnormal situation from a normal one. When you standardize you avoid:

- Going back to the previous conditions.
- Having work tools laying around.
- Having a disorganized work place that you have to organize again.
- Having people who after implementing Seiri and Seiso still accumulate office supplies on their desk.

And you ensure that:

- Items that don’t belong in the area are easily identified.
- The area is always organized.
- The time to find things is reduced.


Now for the steps:

Step 1: Define
There are several kinds of standards like:
- Oder standards.
- Cleanliness standards.
- Item location visual standards.
- Item quantity visual standards.
- Work place visual standards.

The word “standard” means how that particular item or area is when it’s in an ideal state. In other words, the standard illustrates the ideal state. This step is about defining how it’s supposed to be after you’ve organized and cleaned the space.


Step 2: Document
Remember I told you about documenting everything with your digital camera? Well, that’s because this would be the easiest way to show how your work space should look in an ideal state. You could also draw diagrams of where items need to be placed.

Here’s a picture of how my desk ended up once I implemented the first three phases. It was a lot better (Though not quite as good as it could be, but we’ll get to that in phase 5), so this became the first standard I implemented.


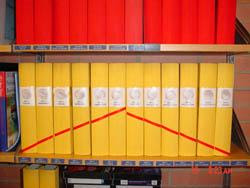
In this next example, see how it’s very easy to recognize when a folder is missing or in the wrong order?


Step 3: Train/divulge
Once you’ve set and documented the standard, you need to make sure that whoever needs to know about it, knows about it! If it’s related to your desk, then maybe you’re the only one you need to know about it. If the standard is of the supplies room, then make sure each person that uses it, knows it, understands it, and follows it. If it’s a picture, post it in a visible spot. If it’s an item quantity standard, post it near the items it relates to.

Now you can compare your current state with the standard and see if they match.

And that’s it for this phase!

But we’re not quite over yet! Meet me here next time to discuss Phase 5, Shitsuke (Improve).
All the best!

Saturday, April 21, 2007

Designers beware: 5S Phase 3, Seiso (Clean)

Welcome back to my series on 5S, the methodology to improve organization, order and cleanliness. In this article I cover the third phase, Clean.

But first, if you’re seeing this article and haven’t read the previous three:
Introduction to the methodology
Phase one, Select
Phase two, Organize

Last week I covered Seiton, where we organized and decided the place for everything. The next phase, Seiso, is about cleaning. Though the methodology lists Seiso as the third phase, it’s possible to clean before you decide where things go.


Phase three, Clean

The purpose of this phase is to eliminate the sources of dirt and to find potentially dangerous areas (i.e. too many plugs in an outlet). When you clean:

- The workplace is a great place to work.
- Things are ready to be used, when needed.
- Cleaning becomes a daily habit.
- Potential safety risks can be addressed.


Now for the exercise:

Step 1: Get ready
Get your supplies like rags and cleaning products and have them ready beforehand.

Step 2: Clean
Pretty straightforward, right? Make sure to be thorough and don’t forget those out of reach places that nobody wants to clean.

Step 3: Place
Place every item in the work area in their decided location.

Step 4: Audit
Once everybody has cleaned their work area, allow for some time, maybe half an hour, in which each person questions how clean every work place is and uses the red labels again, if it’s the case, meaning, if something shouldn’t be in that spot or could be relocated.

And that’s it for this phase!

In industrial environments it has a bigger impact because operators learn more about their machines and see potential industrial risks, like leaks and parts that aren’t working properly, but that’s material for other posts.

By now you’re already seeing the benefits of applying the 5S and if you’ve really embraced it, you’ll notice that you’ve started questioning how other people keep their desks or their houses, haven’t you?

As I said in the first 5S post, you’ll never be the same!

So meet me here next time to cover Phase 4, Seiketsu (Standardize).
All the best!

Sunday, April 15, 2007

Designers beware: 5S Phase 2, Seiton (Organize)

Welcome back to my series on 5S, the methodology to improve organization, order and cleanliness. In this article I cover the second phase, Organize.

But first, if you want to go back to the two previous articles:
Introduction to the methodology
Phase one, Select

Let’s pick up where we left off. Last week I talked about Seiri, to select. At the end of the exercise we had two piles of stuff:

Pile C: The stuff that needs to be in the work space.
Pile D: The stuff that is needed, but not in the immediate work area.


Phase two, Organize

The purpose of this phase is to assign the correct place for each item.

- This will eliminate unnecessary movement because the needed elements are nearby.
- You’ll find elements quicker.
- Error is reduced.
- There are visible clues of where the elements are placed and their quantity.
- The basis for standardization is laid out.


Now for the exercise:

Step 1: Classify
Think about how often you use each item according to the following criteria:

- Infrequent: Things that are used monthly. These can be placed further from the working area.
- Frequent: Things that are used weekly. These can be placed inside the nearby area.
- Very frequent: Things that are used daily. These should be placed in the working area.


Step 2: Quantify
Determine how much of each item is needed in the place where they will be stored. For instance, you may need one black marker on your desk, not five, so the other four can go to the supplies room. Now how many should there be in the supplies room?


Step 3: Place
Determine the exact place where each item goes according to the task they’re used for. Elements needed for the task performed in the specific work area should be inside it.

Group elements according to:
- Process, if they’re used during a specific task, keep them together.
- Function, things that are used for the same purpose, should be kept together.
- Order, things that are used in a certain order, should be placed in a way that will reflect it.


Step 4: Evaluate
Ask yourself:
- Is it obvious when something is missing from its spot?
- Is it obvious when something is there, that shouldn’t be there?
- Do the objects that can be moved, return to their spot?
- Is it visible when you’re running out of supplies?

This step could even include visual clues like contour lines around the spot where things are stored, tags, or quantity indicators to show the maximum amount and the minimum amount so that a new order can be placed.


* This image from the eBook “Estrategia de las 5S” produced by Advanced Productive Solutions, S.L. www.ceroaverias.com


Step 5: Audit
Once everybody has decided the place where everything goes, allow for some extra time, perhaps half an hour, so that everybody can question each other using red labels again. All items marked with red labels need to be relocated within the next few days.


Some additional thoughts:

It is likely that by now you’ve realized that you don’t actually need some of the things you thought you needed. In that case, you can do any of the following actions:

- Store it somewhere else.
- Move it inside the area.
- Sell it.
- Rent it.
- Return it.
- Trash it.

If it’s not needed for the task, it shouldn’t be there. Ideally the only things that should be on a desk is the computer, the immediate supplies like a pen and paper, and the stuff that you’re currently working on. Extra supplies can go in drawers.
Also, don’t forget to document the process with your digital camera.

I want to point out that in the cases of personal offices and desks, 5S is a process that every person needs to assimilate in their own way. Some people are attached to objects that for others have no significant value and this needs to be respected. Each person should take 5S as far as they feel is comfortable for them. For instance, I don’t need to have pictures of every member of my family on my desk; some people do. So beware that everybody has their own pace and nobody is allowed to decide for somebody else in this methodology.

So that’s all for today. Join me here next time to cover Phase 3, Seiso (Clean).

In the meantime let me leave you with this thought: Do you think this can be applied to, say, email, your computer desktop, the closet, the pantry?

All the best!

Sunday, April 08, 2007

Designers beware: 5S Phase 1, Seiri (Select)

Welcome back to my series on 5S, the methodology to improve organization, order and cleanliness.

As I said in my previous post, this methodology can be applied to many aspects of life, as you will surely see in the upcoming weeks, as I unfold the steps to use it in a design studio environment. I won’t go into a lot of depth, since the implementation does depend on your own objectives and the different places of the organization you want to tackle.

So here’s one way of implementing the methodology, CaroAyerbe style:


Let’s say you have a design studio or you work in an in-house design department. Let’s say you want to apply 5S there. The coverage would probably be the design offices and the common areas like the meeting room, the library and/or the supplies room.


Just to show you that I practice what I preach, this here was my actual desk a few years ago, yup, that's my elbow right there...


Before starting:

- Explain the methodology to your people about get a consensus on whether or not they think it’s a good idea to implement it. They always think it's good. (Come on, who doesn’t want to be more productive, right?).
- Designate a team of facilitators which will be in charge of guiding the process.
- One facilitator per area is a good idea.
- Train the facilitators.


Phase one, Select

Basically in this phase you decide what goes and what stays, that’s the main purpose. Why select? Because…

- Work places are filled with clutter.
- The usable space is used by stuff that offers no advantages.
- Closets and shelves contain things that are never used.
- It’s difficult to find the necessary utensils.
- There’s too much stock of stuff you don’t actually need.


What you will need:

- A digital camera. Humans are visual creatures, so one of the best ways to record and evaluate results is to take pictures. The before and after. Ideally, each facilitator has a camera.
- A huge plastic bag, for trash.
- Little red cards. Prepare these beforehand, it can be a little business-card-size piece of paper, with a little ribbon to attach them to objects.


Step 1: Prepare yourself.
Get a plastic bag and red cards.

Step 2: Gather.
Bring all your stuff to one place, near the area you’re working on. Take everything and put it on a big surface… on top of the desk or on the floor. Now, everything means everything. Absolutely every item needs to be accounted for.
It’s necessary to check behind closets, on top of closets, on the walls, places that are not well lit, behind the desk, inside drawers, everywhere.

Step 3: Separate.
Ok, this is where the fun starts! Once everything is in sight, divide it in two piles:

Pile A: The stuff that goes, trash, if you will. What you don’t need.
Pile B: The stuff that stays. What is actually needed or you can’t live without.

So the first pile, pile A, if it’s trash, why make it a pile? Because it’s good to take a picture, and measure how much of what you originally had, was actually garbage. So don’t discard it until the end, but do discard it; this is what the plastic bag is for. The first time we did this, we gathered 127Kg of trash.

By now you’re left with the stuff that is needed, right? Ok, now you’re going to divide that into two new piles:

Pile C: The stuff that needs to be in the work space.
Pile D: The stuff that is needed, but not in the immediate work area.

Step 4: Audit.
Once everybody has separated their materials, allow for some time (maybe half an hour) so that each person can go through other people’s stuff and question if an item should stay by attaching a red card to them. I like to leave a space in the card so that people can write a message on them, something like “do you really need three mugs for your pens?”.

Once the time is over, the person needs to decide whether or not the item goes. Nobody is allowed to remove the cards, until the fate of the item is determined.


And this is the end of phase 1; you now have selected what’s useful.


If you’re one of the facilitators, you will see that deciding what goes and what stays can be tricky for people, especially because we tend to become attached to some objects, so be prepared to deal with someone who thinks they need 7 blue markers and 8 red ones.

If you’re doing this on your own, be honest with yourself and think about what would happen if the object wasn’t there.


Meet me here next time, to talk about Seiton (Organize) and we’ll see what happens to the selected objects!

Do leave me a comment if you have any questions, I’d love to help! Also if you’re familiar with the methodology and would like to add to this article, do so as well! All your comments are welcome.

All the best!


For more information, visit my previous article which is an introduction to the methodology.

Sunday, April 01, 2007

Designers beware: 5 steps to productivity, the 5S.

How would you like to be more productive and have a better workplace? Would you believe me if I said that you can achieve that easily with little or no investment at all?

Would you be able to work here? Do you actually work in a place like this?


Would you like to live like this? Do you currently?


A few years ago, when I was part of the continuous improvement team of the company I worked for, I was entrusted with the task of implementing a certain methodology that promised to improve our productivity. So of course, I had to be the first to test it.

It changed me. I’ll never go back to the way I was before, immersed in clutter, with a feeling of not having any control over my stuff, my activities, my life! Being tired before even starting to work, just by glancing at my desk.

5S (Five eses, if you will) is a methodology that was developed by Japanese companies, mainly Toyota, to improve organization, order and cleanliness in work stations. It can be as extensive as you wish it to be, with thorough measurements of improvement in machinery performance in factory conditions, but as I’ll present in the upcoming posts, it can be applied to almost every aspect of life, yes, the design business included.


What can 5S do for you? Keep reading…

The name 5S responds to five Japanese words that describe each of the five steps:

1. Seiri (Select)
Identify and separate the necessary from the unnecessary items.

2. Seiton (Organize)
Everything has its place.

3. Seiso (Clean)
Identify and eliminate sources of dirt and clutter.

4. Seiketsu (Standardize)
Maintain the status of order and cleanliness achieved.

5. Shitsuke (Improve)
Make it a habit and reach new standards of order and cleanliness.


5S can be defined as an ideal state in which:

- Unnecessary materials or utensils have been eliminated.
- Everything has been identified and been assigned a place.
- Clutter has been eliminated.
- There are visual references to control the status of processes.
- All this is maintained and continuously improved.


By implementing 5S you will:

- Reduce errors.
- Reduce supplies inventory.
- Reduce unnecessary movement.
- Gain more space.
- Be proud of your work place.
- Easily recognize the status of things.
- Quickly find the utensils you need.
- Improve the image your customers have of you.
- Improve your team work and cooperation.
- Improve responsibility and commitment.


There are many resources on the web about this subject, covering all kinds of businesses and situations, big and small, where this methodology can be applied. I’ll be covering each of the steps in a design studio environment and how to implement them and measure the results.

Meet me here next time to cover step 1, Seiri, and learn how to get rid of most of your clutter and not feel guilty about it! :-)

All the best!

Sunday, March 04, 2007

Designers beware: Being the interviewer.

As a design manager you’re sometimes faced with the task of interviewing new designers for your organization; this can make some designers a bit nervous. Here are a few tips to be effective when interviewing other creative professionals.


Before the interview


Define the position: Before you even make the process public, you need to be clear on the responsibilities of the position. Ask yourself questions like:

- What will this person do?
- If a followed him around all day, what would I catch this person doing or saying?
- Who do you want this person to be like, on the team and why?
- Who do you want this person not to be like, on the team and why?
- What are the deliverables of the position?
- What are the behaviors the new person has to exhibit to be successful in this position?


Reply to candidates: If you can manage it, take a few seconds to let each candidate know you received their information. I do. I receive most resumes by email, so I reply immediately. I have a template response email, so I just change the name of the person. If you can’t manage it, you can do it in bulk, when you have some resumes stacked up. Not many people do this and I think it speaks well of you and your company.


Review each resume in advance: Decide the key points you’re looking for beforehand, so that you can pick those up quickly. Circle a couple of accomplishments or projects in the portfolio that catch your eye, so that you can ask the candidate about them during the interview.


Device a tracking table: Unless you’re in a big company where HR is directing the search, I’d recommend creating an Excel tracking chart for your candidates. Especially is there’s a lot of them. I don’t enter every single candidate in it, but I do keep track of those candidates that I will be interviewing based on their resume and portfolio. I include relevant information, like age, academic degree, email, date of the interview. I also color code them and leave a field open to write my impression of the interview.


During the interview


General interview tips:
- Don’t read the resume in front of the candidate.
- Ask about parts of the resume, not all of it.
- Have the questions written down.
- I like to ask them to tell me briefly about their portfolio. I actually picked this from another designer I was doing a selection process with.


Ask the right questions: As I pointed out in an earlier post, I like to ask questions that will help me to decide if the person is a good match for the position and for my team. Here are some sample questions I ask:
- How did you hear about us?
- Why did you become a designer?
- What did you expect to achieve as a designer then?
- What do you expect to achieve as a designer now?
- In what type of atmosphere/environment do
you feel most comfortable working in and do you do best working in groups or by yourself?
- What are your skills?
- What are your flaws?
- What’s your creative process?
- How does your expertise relate to our company?
- How do you think you’ll help us increase sales?
- What are your salary expectations?

You can also ask about the couple of accomplishments you circled in their resume.
Ask about a time when they did x. How did they do it and what were the results? This may be extracted from a situation that happened to you recently so that you can compare the two instances.


Evaluate the answers in a structured way: According to Manager Tools, here’s a good way of structuring your perceptions: Divide them in four categories, interpersonal, cultural, skills and technical, and for each of them write down the behaviors that led you to draw your conclusion.


Evaluate body language: I'd covered this before, but my friend Fernando Pacheco from www.saturnattacks.com reminded me that it was important to cover this here again and I agree! I look for confidence, candidness, energy and professionalism. Signs of excessive nervousness, clues on lack of confidence or inappropriate/unprofessional behavior also show through.


After the interview


Decide, right then and there: I like to make quick decisions. In this case it’s either yes, no or maybe. Decide immediately after the interview and record it in the Excel table. Avoid deciding on “maybe” too much, otherwise you’ll be stuck having to decide yes or no, later.

Inform the outcome: Again, take the time to inform the outcome of the selection process to each candidate. It can be a personalized email or a phone call if the candidate made it to the final steps.

I look forward to receiving some comments or additional tips!

All the best!

Monday, January 15, 2007

Designers beware: 10 tips on designer resumes.

Looking for a job? Yes, a very daunting and stressful experience, especially if you’re a fresh-out-of-college designer applying for your first job.

I’ve had the opportunity to interview many designers for in-house positions and I’ve found that most designers would benefit from some guidance on how to promote themselves. This is particularly relevant to designers in South America and Colombia where design is a relatively new profession.

The times, they are a’ changing, and designers need to rise to the level of most professionals. Design is a business. It’s not just about the perfect decoration in the pretty resume. It has to convey a message of professionalism, a message that you can actually do the job. Even if you’re a designer with experience, here are ten tips for designers writing their resume:


Tip 1: Do some research.
Even if you think you know everything there is to know about designing a document, find out about effective ways to present a resume. There are tons of websites with information about it like Rita Sue Siegel Resources and even this here article may help you. Now, being a designer, you are expected to show your creative side in your resume (At least I expect that). Nevertheless, this is a document for you to show that you’re a professional and therefore, all the right information must be included, even if it means sacrificing that beautiful symbol you want displayed in the whole page.


Tip 2: Customize your resume to match the position.
Designers work in different areas of design. I’ve seen this especially with graphic designers. So when the position calls for an illustrator, make your resume reflect that in the jobs or projects you want to show. If the position calls for a web designer, then include all web work you’ve done with links. If you think something else will add to your value proposition, include it. However, don’t try to squeeze all your work experience in just one page if some of it has no relevance to the position.


Tip 3: A one page resume.
Yes, all the necessary information can fit in one page, as weird as it sounds. You have to think that the person receiving your resume is receiving a lot more and she probably is printing them out. Make her job easier by including all pertinent information in a single page, you will earn some extra points for that.

Now, you’re a designer, play with typography, space, color… it’s also very important to make sure the information is presented in an organized, clear, easy to read way and have some fun! Make your personality and style show through. Don’t forget to double, better yet, make that “triple” check your document for typos and grammar errors. Nothing says “unprofessional” like a sloppy resume. Here's an example of a one page resume. Granted, this was a fresh-out-of-college designer and didn't have a lot of information to include, but you get the idea.


Tip 4: Your name and contact information are the most important thing.
Follow what you learned in school and make your name and contact information stand out by placing them where they will be easier to read for the recruiter: most likely the right top corner of the page, or top centered. Do include all your contact information, telephone numbers where you can be reached for sure.

If your email is something like “big_stud@hotmail.com” it’s better to get a new one, just your name and last name, something that identifies who you are. I personally think that it’s not necessary to include your photo, though I’ve seen some pretty cool ways to add a picture of yourself as an illustration or an unusual treatment in Photoshop. If you’re applying for a job as an illustrator, this could be a good highlight for your resume.


Tip 5: Your profile.
Include a brief paragraph expressing what your profile as a designer is, or what your major areas of expertise are and what short term goals you have. This helps the recruiter see quickly if your profile matches what they’re looking for.


Tip 6: Now for the work information.
Include your work experience, listing jobs in reverse chronological order. For each job include:

a. The time period you had that job, including year and month.
b. The responsibilities of the position.
c. The achievements of the position, and how they translated into either an increase in sales or the reduction of costs for the firm. Include some numeric information, when possible.

If you’ve worked as a web designer, or have links to your work on the internet, make sure they work properly and contain all current information.


Tip 7: Academic information.
Include the qualifications you have and filter them to be pertinent to the position you’re applying to. List them in reverse chronological order too. Be sure to include the year in which you graduated and the title you received.


Tip 8: Is it the right file?
When sending your resume file through email, take into consideration:

a. Check that your file is complete. Yes, I have received resumes of one page, where it only lists the jobs, with no name or contact info, because they forgot to include the previous pages.

b. Name your file with your name. i.e. carolina_ayerbe_CV.pdf; make the work of the recruiter easier, and make your resume easy to find among all the files she’s downloaded that are called “CV.doc”, “resume.pdf”, “current_resume.doc” and every other combination that doesn’t provide any information as to what the file contains.

c. Include your name, title and the position you’re applying to in the subject line of the email. It makes it easier to find you in the long list of emails the recruiter received every day.

d. Open some doors by writing a short, warm and assertive email message to go with your attachment. Don’t just send the attachment alone; some people might take this gesture to be rude. Say hello, at least. Don’t underestimate the value of a well crafted message selling the benefits the company will get by hiring you. If necessary, go back to the Tip 1 and do some research on how to write a proper cover letter.


Tip 9: Don’t lie.
Most recruiters can see through a liar. Show your work in a dignified way, talk about your accomplishments, but don’t try to sell things as more than they really are. I once received a CV from this designer that presented himself as a “brand creator”. Hmm, interesting, I thought.

When I interviewed him I asked him how he went about creating a brand; it became obvious the guy had no idea what he was talking about. We both wasted our time. Be honest about what you’ve achieved. It’s much more effective.


Tip 10: Combine your resume with your portfolio.
I really like it when the resume includes some examples of the work the designer has done. All contact, work and academic information should be in the first page.

From the second page on, it’s a good idea to include three or four examples of your best work. This will be the entrée for the recruiter to ask for a complete portfolio. Don’t send twelve pages, though. Still keep it short, two or three pages maximum.


I hope these tips help out a few designers out there.
I look forward to receiving some comments!

All the best, Carolina Ayerbe.